Masks Are Easy Part 2 pg 5: Production Graphics with Wendy Peck at webreference.com
 |
Masks Are Easy Part 2: PhotoShop Load/Save Masks | |
|
|
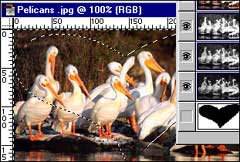
You can import an Adobe Illustrator image into a channel for use as a selection or to create a layer mask. Create an image in a vector program and save as Adobe Illustrator (.ai) format. Open the Channels window. In the fly-out menu choose New Channel. The default channel is filled with black. Since the imported image is black, make sure the new channel is active and choose Fill>White. Choose File>Place from the main menu and select your
file. The graphic can be repositioned and resized.
|
|
|
Graphic imported and added to a layer mask with text added. |
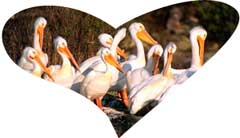
To create a layer mask, choose Load Channel as Selection to create a selection. Activate the layer where you desire the mask. Click on the Add Layer Mask icon at the bottom of the layers window to create the mask from the selection. Apply effects as desired. (See Layer Masks.) With a layer mask, you can add effects to the outline of the imported graphic as shown here. The heart was imported into a channel, and then a layer mask created. A graduated fill was added outside the heart area in the layer mask. This method was also used to create the photo within a heart at the left. The text was added with the text selection tool on the mask and filled with white to allow the photo to show through (method shown below). |
|
|
|
|
|
|
Text created with the Text Selection tool and filled
with white to allow the photo to show through the mask. Image cropped
to text borders below and shown on a black background. |
Add text to a mask Add a layer mask and fill with black to mask all. Choose the Type Mask Tool from the tool box and enter your text. Hint: You can adjust the size of your selection with Select>Transform Selection in the main menu. Fill the selection with white to allow the text portions of the layer to show through. Crop the image to the text for the look shown at right. You can also move the mask within a layer. Click on the chain icon
between the layer thumbnail and the mask thumbnail in the layer window.
Choose the Move tool from the toolbox and move the mask to the desired
position. |
|
 |
||
|
Photos © Tom Thomson Photography. Used with permission. |
With the methods included in both parts of this tutorial, you have learned the basics of masks. There is no end to the possibilities for effects using the various mask methods. If an effect seems difficult or time consuming, think about masks. Chances are good that one of the mask techniques will help you reach the look you want. |
|
|
|
Masks Are Easy Part 2 Tutorial IndexMasks Are Easy Part 2 Start
|
|
 On
import it will have an "X" through it as shown here. Move
or resize and double click within the graphic to set the import. Your
imported image is now a channel. Choose Load Channel as Selection to
create a selection and apply desired effects.
On
import it will have an "X" through it as shown here. Move
or resize and double click within the graphic to set the import. Your
imported image is now a channel. Choose Load Channel as Selection to
create a selection and apply desired effects. 


 You
will have to crop the image or fill any areas that are exposed through
moving the mask as shown here. Note that the link symbol is missing
from this sample. Once your mask is in the correct position, click
again between the layer and mask thumbnail to restore the link between
layer and mask.
You
will have to crop the image or fill any areas that are exposed through
moving the mask as shown here. Note that the link symbol is missing
from this sample. Once your mask is in the correct position, click
again between the layer and mask thumbnail to restore the link between
layer and mask.
URL: https://www.webreference.com/graphics/
Created: Apr. 15, 2000
Revised: Apr. 15, 2000
 Find a programming school near you