Masks Are Easy pg 3: Production Graphics with Wendy Peck at webreference.com
 |
Masks Are Easy 3: Why Bother | |
|
Photos © Tom Thomson Photography. Used with permission. |
So we have seen the very basic mask principles on the previous pages. I want to again remind you that masks are only selections. No more and no less. So why not just use selections? Why bother with the confusion of masks? Technically you can use only selections, but you will be limited to what you can draw with a selection tool, and for someone like me, with a short attention span, that makes for some pretty dull design. Masks, on the other hand, will accept any of the powerful painting options that a raster program offers. You saw a clue to this with one of the samples on the previous page I have repeated it here. The layer is filled with a solid green, but the mask has been filled with a pattern fill. It would not have been terribly hard to get the same effect without a mask, but lets up the complication level a bit. Suppose we want to apply this pattern to a photo.
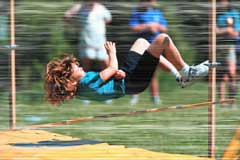
If you study the two samples here, you will see how the mask is creating a texture based on the pattern fill in the mask. In the light areas of the mask, the photo appears remember that white has no masking effect and black totally blocks the effect. In this case, the effect is the photo, so the light areas let the photo show, the dark areas prevent the photo from showing and let the background show through. In the first sample at the left, there is a blue background under the image layer. In the second sample, the background has been changed to white. See how the photo thumbnail is exactly the same in each sample. The transparency and texture is being controlled by the mask. The pattern color is coming from the background color. The true power of masks starts to sink in when you realize how much control you have over the mask. The texture in the photos above is interesting, but the impact of the girl is lost. In the image below, I have added a feathered white fill to the center of the mask to let the girl show through without texture. Masks can be turned off and on, saved and imported into other documents, and do not prevent editing of any type within the unprotected areas of the layer. Here is a final review example before we move on to specifics. In the sample below, I created a rectangular selection and then created a layer mask. With the layer edit activated I filled the layer with a pattern fill. I activated mask editing, selected a rough brush, and airbrushed along the right edge. The result, with the layer information, is shown below.
You now have the basic principles of masks. Let's take a look at specific methods in different software packages. You will probably want to take a look at each one for ideas, even if you do not have all the software, since I will use different effects to illustrate the mask methods. |
|
|
|
Masks Are Easy Tutorial IndexMasks Are Easy Start
|


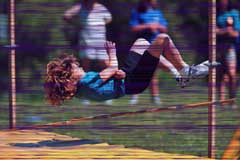


 I
have taken a photo, shown here, and applied the same pattern as in the
sample above to a layer mask.
I
have taken a photo, shown here, and applied the same pattern as in the
sample above to a layer mask. 
URL: https://www.webreference.com/graphics/
Created: Mar. 29, 2000
Revised: Mar. 29, 2000
 Find a programming school near you