Masks Are Easy: Production Graphics with Wendy Peck at webreference.com
 |
Masks are Easy ... Really! |
|
|
|
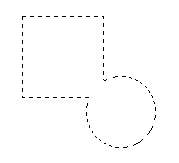
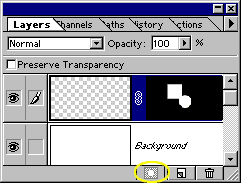
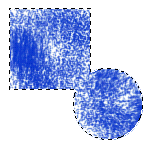
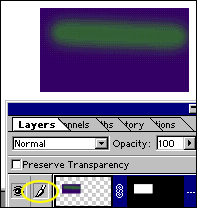
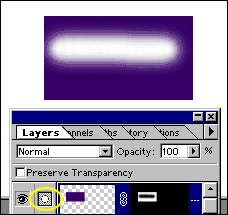
I am going to go out on a limb here. Masks are easy and I am going to prove it. I may be thrown out of the graphics world for making such a statement, since there seems to be a mystique attached to masksakin to a secret handshake. If you know the secret, you can unleash the power of masks. If not, you are left to look over the mask fence for years. Secret: Here is what I consider to be the secret of masks. They are simply a selection. Sometimes they take on sexy forms, and are always referred to with reverence, but the truth is, they perform the exact same duty as the little marching ants in a selection boundary. Oh, and they seem to be backwards, which we will get to in a minute. Grasp those concepts, practice a little with the techniques I have included here, and you will have mastered masks. Note: I will cover how-to methods for masks in more software programs later in this tutorial, but will use PhotoShop for the basics. This is part one of a two part tutorial. Here is a sample of the absolute basics. I created a simple selection with the rectangle and ellipse tools. The sample at the top left is the result. I then clicked on the Add Layer Mask icon (shown with yellow highlight) at the bottom of the Layers window to add a mask. The selection boundaries disappear when the mask is created the mask is now doing the job. Just to drive home this point, see the examples here. In the first blue sample, you can see the selection boundaries. I created this sample with no mask, just a regular selection created as above. I then painted with the airbrush, and as you would expect, only the area within the selection boundaries accepted the airbrush color. In the second sample I have added a layer mask. Again, I painted with the airbrush, and while there are no selection boundaries showing, only the area not covered by the mask will accept the airbrush color. Note where the brush is in the sample no matter how far outside the white areas on the mask you click your brush, only the area that is white in the mask can be affected. So what's with the backwards selections? Well, when you select an area, it makes sense that you are choosing where the color will go. You are "selecting" after all. In computer work, we always expect what we have selected or activated to be what gets the effect. Masking is the opposite. Think of when you are painting and you use masking tape to cover where you do not want the paint to go. Or picture it like a stencil, with a hole cut where you want the paint to go. Masks protect the area you do not want to have an effect applied to. |
|
|
|
|
|
|
|
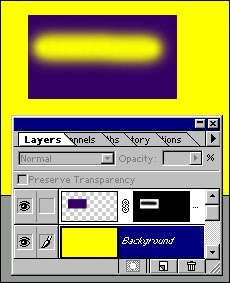
If it is so easy, why is it so confusing? That leads to the second type of confusion for masks. You can edit the design on the layer, as we did above with the airbrush, or you can edit the mask. Back in the days when I was struggling to learn PhotoShop (I did not know even one other person who was also using it), and I believed masks were an evil joke played on designers, this is where I would trip. I have two samples at the left to illustrate the difference between editing the mask and editing the layer. In the top sample, note how the brush icon is showing (highlighted with yellow). In PhotoShop, this is the indication that you are editing the layer. I have taken one brush stroke across the blue with a green brush. Since the area I was working in was not masked (note the white area in the mask) the brush applied the color. In the second sample, I have switched to mask editing mode, represented by the mask icon (yellow highlight). I used the same brush and painted in the same area. But since I was in mask edit mode, the change occurred to the mask Note how the white area of the mask now has a black stripe through it. Since I was using a feathered brush, the mask effect is feathered. I have included a final sample that shows a colored background behind the layer we were working on. Note how the background shows through in all the black areas of the mask. The effects on the layer with the mask are only allowed to show through on the white areas. The black areas are "protected." In other words, we cannot change our document on this layer anywhere that there is black on the mask, so the yellow shows through. Note also how the feathered edges of the brush stroke allow varying amounts of the yellow to show through. If we could see the mask thumbnail more clearly, you would see shades of gray creating the feathered effect.
|
|
|
|
||
|
|
Masks Are Easy Tutorial IndexMasks Are Easy Start
|

URL: https://www.webreference.com/graphics/
Created: Mar. 29, 2000
Revised: Mar. 29, 2000
 Find a programming school near you