Masks Are Easy pg 7: Production Graphics with Wendy Peck at webreference.com
 |
Masks Are Easy 7: PaintShop Pro Masks for Artistic Effect | |
|
Graduated fill used to create mask. This is the mask used to create the photos below.
Mask applied to a layer with a white background on the layer below.
Identical to the above photo, but a yellow background fills the layer below. |
When you are comfortable with masks, effects that would be impossible, or certainly impractical for most commercial projects become quick and easy. One of the most common applications for masks is to fade portions of an image. This is easy accomplished with graduated fills on a mask, and leaves the option to change background color without having to redo the fill effect. Open the photo and duplicate the background layer. Choose
Masks>New>Show All or create a mask by right clicking on the Create
mask icon in the Layers Palette and choosing Show All. This places a
mask filled with white, or no masking. Choose Masks>Edit Mask to
create the mask. Apply a gradient fill. I have included the settings for the custom fill I used on this photo. Work with the Edit feature of the Gradient fill until you have a result that works with your photo. Each photo is a little different. Try the radial and rectangular gradients as well for some dynamic effects.
|
|
|
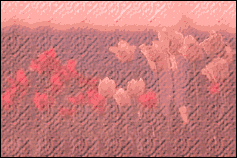
Art like image created with a textured mask placed over the entire photo, and selective areas removed from the mask with a soft paintbrush. The original photo is shown below.
Original photo. When you are working with effects like this, it is best to work with a high quality, sharp image.
Mask with texture applied ready for painting the flowers through the mask. Photos © Tom Thomson Photography. Used with permission. |
The image shown at the left was created from a photo using a layer mask. Open the photo and duplicate the background layer. Choose Masks>New>Hide All or create a mask by right clicking on the Create mask icon in the Layers Palette and choosing Hide All. Fill your background layer with white. Choose Masks>View Mask and Masks>Edit Mask from the main menu. Choose Image>Effects>Texture and use the following settings: Texture 6, Size 49%, Smoothness 0, Depth 1, Ambience -100, Shininess 96, Angle 315, Intensity 100, Elevation 7. Note: For any texture on a mask you will probably need a high Shininess setting, as well as an increased Light Intensity and low Light Elevation for the effect to show. See the resulting mask at the left. To bring the flowers from the background, make sure that Edit Mask is turned on and choose a small, soft paintbrush. Set your foreground color to white and paint over the flowers. You may wish to work without the mask view turned so you are working with the final appearance. Work carefully on the first few flowers to get the feeling for where to place your brush, and the rest will go quickly. Try dabbing with the brush rather than dragging.
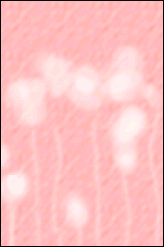
The image at the right shows a magnified view of the mask. Note how soft the edges are on the white areas in the mask the areas where the flowers show through. Experiment with the many effects included with PaintShop Pro. You may find an effect that will work to provide an artistic touch and consistency for an entire site. Make sure you watch for the second part of this tutorial which will cover saving masks, using alpha masks and importing images for masks. |
|
|
|
Masks Are Easy Tutorial IndexMasks Are Easy Start
|


 It
is best if you do this effect without the Show Mask activated so you
can see the actual results as you work.
It
is best if you do this effect without the Show Mask activated so you
can see the actual results as you work. 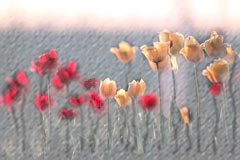

 In
the photo above, the stem lines were added without much concern for
where the actual stems in the picture were located. I used a very small
brush and sketched in the stems to balance the image.
In
the photo above, the stem lines were added without much concern for
where the actual stems in the picture were located. I used a very small
brush and sketched in the stems to balance the image.
URL: https://www.webreference.com/graphics/
Created: Mar. 31, 2000
Revised: Mar. 31, 2000
 Find a programming school near you