Masks Are Easy pg 5: Production Graphics with Wendy Peck at webreference.com
 |
Masks Are Easy 5: PhotoShop Quick Mask | |
|
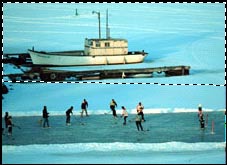
Note how the selected area from the top photo is now the only portion of the photo that is not covered by the "mask." Remember from the layer mask discussion, that regular selections enclose the area of the document where an effect may be placed, and masks cover the area that will NOT receive the effect.
Gradient fill applied with Quick Mask mode active above. Identical selection shown in Standard Edit mode below.
|
PhotoShop offers a wonderful little one click-wonder called the Quick Mask. It works in much the same way as the masks we have been looking at in this tutorial, but it is not applied to a layer. In fact, it is a temporary mask that can make selecting areas much easier. As with any mask, you can also use all painting tools for effects that would be impossible using only selection tools. The two samples at the left illustrate Quick Mask basics.
In the top photo, a regular rectangular selection is shown. And you will toggle back and forth. Unlike the layer mask which becomes and integral part of the layer, Quick Mask is a temporary setting. You cannot apply any effect to the document when you are in Quick Mask mode. This setting is simply a selection tool. However, it is a powerful selection tool, since any tool that will work on a grayscale image can be used to edit while in Quick Mask mode. Note how the foreground and background color change automatically to black and white when you change to Quick Mask mode. Although the mask is shown in red to represent rubylith masking (a holdover from the pre-digital print industry), black and white have the same effect as they do for layer masks. Painting a Quick Mask with the foreground as black provides a total mask, while white masks nothing. Important: When you are in Quick Mask mode, any effect you create will be applied only to the mask, not the document. In this set of samples, I have started with Quick Mask mode activated. I chose the gradient tool and set a gradient fill from black to transparent, bottom to top. This will protect the area of the skaters from any effect. The second sample here is exactly the same, but I have
returned to Standard Edit mode. The selection area is actually feathered,
but of course there is no way to show that with the marching ants selection
borders |
|
|
|
|
|
|
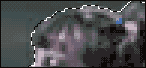
Rough selection done quickly with standard selection tools.
Switching to Quick Mask mode makes accurate selection very fast, since you can use any paint tool. Quick Mask mode above and Standard Edit mode of the same selection.
Photos © Tom Thomson Photography. Used with permission. |
Where Quick Mask truly shines is as a selection assistant. It is not difficult with most images to create a rough selection, but fine tuning it becomes a challenge when working with standard selection tools. In the samples at the left, I started first with a quick selection using the Magnetic Lasso tool. It is pretty rough and adding and subtracting from this selection would be an exercise in patience and endurance. However, if you switch to Quick Mask mode, you are able to use paint tools to get very accurate selections.
To use paint tools, simply switch to Quick Mask edit. Choosing black as a foreground color with any tool will add to the mask. White as the foreground color removes the mask. I find that I am constantly toggling between Standard and Quick Mask mode when cleaning up a selection.
You can also see Quick Mask used to keep track of selections when creating outlines in the tutorial: Text as Design. Learn to use Quick Mask. Remember the shortcut the "q" key. Once you have completed one difficult selection with Quick Mask, you will be converted forever. Make sure you stop by again for part two of this tutorial when we will look at saving selections, alpha channels and importing images as masks. |
|
|
|
Masks Are Easy Tutorial IndexMasks Are Easy Start
|


 The lower photo is exactly the same except the Quick Mask option has
been chosen from the tool bar (just below the foreground and background
selectors). Quick Mask mode is selected in the view of the toolbox shown
here. To change back to the regular selection mode, simply click on
the Standard Mode button. You can change between modes with these selectors,
or simply use the "q" key on your keyboard to toggle back
and forth.
The lower photo is exactly the same except the Quick Mask option has
been chosen from the tool bar (just below the foreground and background
selectors). Quick Mask mode is selected in the view of the toolbox shown
here. To change back to the regular selection mode, simply click on
the Standard Mode button. You can change between modes with these selectors,
or simply use the "q" key on your keyboard to toggle back
and forth.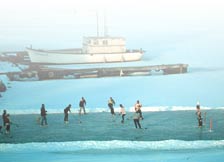 probably
the strongest reason to use Quick Mask often. In the Quick Mask version
of this operation, it is very clear what areas are protected and which
are not, as well as the level of transparency at all points in the selection.
The final image (right) shows the result of filling the selected area
with a 100% white fill.
probably
the strongest reason to use Quick Mask often. In the Quick Mask version
of this operation, it is very clear what areas are protected and which
are not, as well as the level of transparency at all points in the selection.
The final image (right) shows the result of filling the selected area
with a 100% white fill.

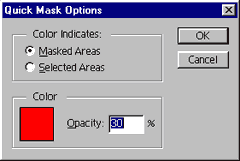 Note:
I reduced the intensity of the red mask indicator from the default value
of 50% in order to more easily see the detail. You can also change the
mask color if the red is too close to a color in your image. Double
click on the Quick Mask edit button to set color or change overlay transparency.
Note:
I reduced the intensity of the red mask indicator from the default value
of 50% in order to more easily see the detail. You can also change the
mask color if the red is too close to a color in your image. Double
click on the Quick Mask edit button to set color or change overlay transparency.
 Here
is the final Quick Mask view before I changed to Standard edit mode
and deleted the background. Hint: After deleting the background,
feather the selection using a very low number or contract or expand
the selection by 1 or 2 pixels and apply a blur to soften the edges.
Here
is the final Quick Mask view before I changed to Standard edit mode
and deleted the background. Hint: After deleting the background,
feather the selection using a very low number or contract or expand
the selection by 1 or 2 pixels and apply a blur to soften the edges.
URL: https://www.webreference.com/graphics/
Created: Mar. 30, 2000
Revised: Mar 130, 2000
 Find a programming school near you