Masks Are Easy pg 6: Production Graphics with Wendy Peck at webreference.com
 |
Masks Are Easy 6: PaintShop Pro Masks | |||
|
|
Paint Shop Pro offers powerful mask capabilities. You can apply any effect to a mask that you can apply to a grayscale image, including filters, paintbrushes and pattern fills. See the introduction in this tutorial for basic mask principles. Although you can apply a mask to any type of image, I am using photographs for the following techniques. Keep masks in mind though, even when you are creating art from scratch in PaintShop Pro, since they can be great time savers and help to provide consistency. We will cover mask basics in this tutorial, with saving masks, alpha channels and importing images for masks in the next tutorial (April 17, 2000). |
|||
|
|
|
|||
|
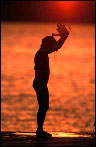
Photos © Tom Thomson Photography. Used with permission. |
Create a basic mask
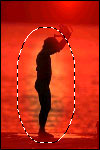
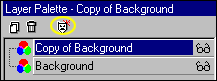
Choose Mask>Edit Mask from the main menu. When this option is checked, any changes you make will take place on the mask. Create an oval selection with the ellipse selection tool, and a feather setting of 25% for this look. Fill the selected area with white to create a hole in the mask to let your photo show through. To create text on the mask, make sure you have selected Now fill the background layer with black to acheive the final appearance. In this sample, I deliberately held the oval selection a little short of the child's head to illustrate that you can also edit the mask with the brush tools. Choose Masks>View masks to turn off the mask view. The mask is still in effect, but will not show. Note that the mask is over the watering can in the photo above, but in the one at the right, the watering can is now exposed. With the Mask Edit turned on, and white foreground color, paint to remove any areas you would like to exclude from the mask. Use a soft brush for a feathered appearance, and if necessary, soften the edges with the Retouch tool. Now that we have worked through this sample with this method, I would like to introduce another way to acheive the same result and is actually a more efficient method, since you can have your background color already set. (I did the first sample with a full layer mask, since I think masks are easier to understand if you start without a selection.) Open your photo as above and create a duplicate. Fill the background layer with the final background color. Create the same oval selection as above BEFORE you create the layer mask. Click on the Create New Mask icon and choose Show selection or choose Masks>New>Show selection and a mask will be placed using the selection boundaries. If you would prefer the inverse to the selection to be showing through the mask, choose Hide selection as you create your mask. Enter your text as above. This is the basic method for all masking in PaintShop Pro. Practice, since it does take a while to remember to switch back and forth from Edit Mask to standard mode. The shortcut to toggle between the two modes is CTRL K one well worth learning. Carry on to the next page and see an artisitic application of this method and make sure to come back for part two of this tutorial when we look at advanced mask tools and methods. |
|||
|
|
Masks Are Easy Tutorial IndexMasks Are Easy Start
|


 Choose
Masks>New>Hide All from the main menu, or right click on the Create
Mask icon in the Layer Palette and choose Hide All from the pop-up menu.
This places a mask over the entire layer.
Choose
Masks>New>Hide All from the main menu, or right click on the Create
Mask icon in the Layer Palette and choose Hide All from the pop-up menu.
This places a mask over the entire layer.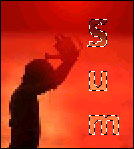 Mask
Edit mode and enter your text. It will be presented as a selection boundary
on the mask. Fill with white to remove masking. In this sample you can
see the selection boundaries and the shaded areas in the letters showing
the photo behind the mask.
Mask
Edit mode and enter your text. It will be presented as a selection boundary
on the mask. Fill with white to remove masking. In this sample you can
see the selection boundaries and the shaded areas in the letters showing
the photo behind the mask.
URL: https://www.webreference.com/graphics/
Created: Mar. 30, 2000
Revised: Mar. 31, 2000
 Find a programming school near you