Masks Are Easy Part 2 pg 3: Production Graphics with Wendy Peck at webreference.com
 |
Masks Are Easy Part 2: Save a Selection in PhotoShop | |
|
Photos © Tom Thomson Photography. Used with permission. |
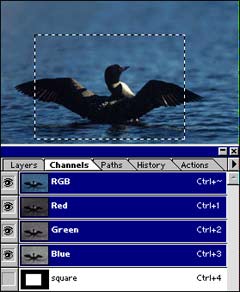
We are going to move into an area that can be confusing. If you are new to masks, channels or saving selections (or simply tend to get confused), try this simple exercise. Open any image in RGB mode. Choose the Rectangular Marquee Tool (basic selection tool) and select an area. Open the Channels window and look at the channels. You will see four channels: RGB, Red, Blue and Green. We will now save the selection which will place a mask of our selection as a channel. Choose Select>Save Selection and the Save Selection window will open. Type Square for the Name and accept the other settings. You have just saved the rectangular selection. Check the Channels window. There will now be another channel called Square. (Shortcut: You can also save the selection as above with the Save Selection as a Channel icon at the bottom of the Channels window. You can change the name of the channel through the Channel Options option in the fly-out menu.) Click off the selection to remove. Because we have saved the selection, we can reload it. Choose Select>Load Selection to open the Load Selection window. Choose Square from the Channel list. Your selection returns to the active document. Loading the selection from the Channels window Choose Select>Deselect or click outside the selection to remove the selection. Open the Channels window. Click on the Square channel, and the selection mask will appear in your image. Do not panic. Although you are only seeing the grayscale image of the mask, the the image is still there. (Click on the RGB setting again if you are not the trusting type you will see I have not led you astray. Click back to the Square channel to continue.) Click on the Load Channel as Selection icon at the bottom of the Layers window (shown highlighted by yellow). Note that the selection is showing on the mask. Choose the RGB channel, and you will see your photo with the selection in place. Both methods described above accomplish the exact same results. Some mask confusion comes from the variety of methods that will accomplish the same tasks, but as you increase your mask use, you will find yourself using more than one method to load, save, edit and share masks. This flexibility is one of the things that makes PhotoShop's mask features so powerful. You may wish to pause here and go back to Part 1 of this tutorial. Reviewing the tutorial on layer masks and Quick Mask, plus the selection masks featured here, will help you to understand how the different types of masks behave in PhotoShop. Carry on to the next page to look at sharing masks between documents and loading masks from other programs. |
|
|
|
Masks Are Easy Part 2 Tutorial IndexMasks Are Easy Part 2 Start
|

URL: https://www.webreference.com/graphics/
Created: Apr. 13, 2000
Revised: Apr. 13, 2000
 Find a programming school near you