Masks Are Easy Part 2 pg 4: Production Graphics with Wendy Peck at webreference.com
 |
Masks Are Easy Part 2: Importing Mask Channels | |
|
|
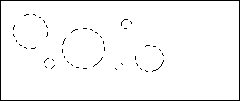
Sharing masks between documents We just learned that you can save a selection and load that selection back into the document at any time. But you can also load the saved selection easily into another document. If you are working with images of the same size, you can load the selection from one document to the other through the Load Selection menu. The dots in the images at the left were all created from the selection shown at the top. The selection was saved in the first document. The document containing the saved selection remained open as each of the other images was created, at exactly the same size as the original. With the new document active, Select>Load Selection was chosen to load the selection into that document. Fill and effects were applied. The second and third variation repeated this process. Lots of possibilities for sharing selections come to mind, but needing same size images can be very restricting. There is a solution though. |
|
|
|
||
|
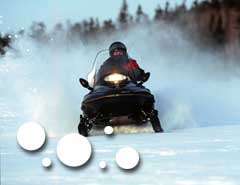
Selection imported from a a different sized image to create spots shown here. |
Importing selection when image size varies
|
|
|
|
|
|
|
Photos © Tom Thomson Photography. Used with permission. |
Creating your own effects Although dragging a channel from one image to another gives you more freedom than working with same sized images, you still must plan ahead. When the saved selection is larger than the new image, parts of the selection will fall outside the image boundaries. Plan ahead and make sure your selection is smaller than your smallest image. In the sample at the left, this image is used as the base for creating
a rough edge. The original selection was created with the Rectangle
Marquee. Add rough edges with the Quick Mask mode and a rough paintbrush.
To ensure that the frame is small enough to be contained on any of the
subsequent photos, choose Select>Transform select to reduce the size
of the selection. Choose Select>Transform to restore the selection to the edge. Select delete to clear the selection and create the rough edge. The final effect is shown here. With the image containing the selection still open, open (or create) another image. Drag the selection channel to the new image. Transform selection to reach the image edges and complete as for the initial image. This is a method you should practice until it is second nature if you do repetitive graphics you will save countless hours. Consistency is guaranteed, too. In fact, it is often worthwhile to create a separate document that contains nothing but selection channels for each project. As you create special effects, drag the channels into the master document. |
|
|
|
||
Masks Are Easy Part 2 Tutorial IndexMasks Are Easy Part 2 Start
|


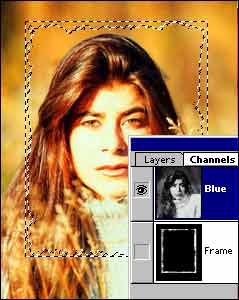
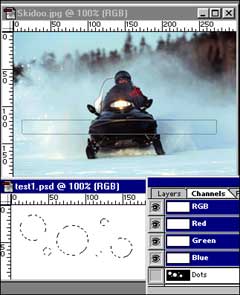 Open
the Channels window in the original document. In this example, the Channels
window is shown beside the original document which is below the new
image. Click and drag the Selection channel that you wish to transfer
to the new image. Release the mouse button and the channel will be added
to the Channels window of the new image. Click on the Load Channel as
Selection to activate the selection. Move your selection as desired.
For the effect shown at the left, create a new layer. Fill selection
with white and add drop shadow effect.
Open
the Channels window in the original document. In this example, the Channels
window is shown beside the original document which is below the new
image. Click and drag the Selection channel that you wish to transfer
to the new image. Release the mouse button and the channel will be added
to the Channels window of the new image. Click on the Load Channel as
Selection to activate the selection. Move your selection as desired.
For the effect shown at the left, create a new layer. Fill selection
with white and add drop shadow effect. 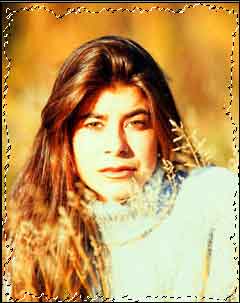

 Save
the selection to a channel.
Save
the selection to a channel.
URL: https://www.webreference.com/graphics/
Created: Apr. 13, 2000
Revised: Apr. 13, 2000
 Find a programming school near you