Masks Are Easy Part 2 pg 2: Production Graphics with Wendy Peck at webreference.com
 |
Masks Are Easy Part 2: Channels | |
|
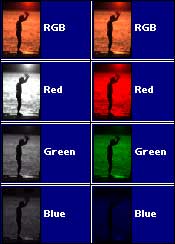
Photo shown with channel window displaying the color channels that make up the image.
Left column shows default color channel. Right column shows the same channels with preferences set to show channels in color.
Alpha one is a channel containing the selection of the child's outline. This selection will be available at a later time.
Sample showing the main image view when only the Red channel is selected. The selection will remain and affect all channels when the RGB channel is activated. Photos © Tom Thomson Photography. Used with permission. |
In order to fully understand saving masks, we must go where I will have to drag some of you kicking and screaming channels. I spoke in the first part of this tutorial about the mystique surrounding masks in the computer graphics world, but the fear and lack of understanding about channels seems to be greater than with masks. We are going to put that to rest once and for all right here. Channels are simply the view of an image separated into color components. If you are working with images for the Web, you will be working in RGB mode, or Red, Green and Blue. These three colors are used to produce the images you see on your screen. Channels simply take the image and divide the information on a color basis. See the sample at the left of a photo, plus the channels that make up this image. Channels are represented as grayscale images. To help understand how the channels work, I have included a comparative view of the color channels. In the left column, the channels are represented as grayscale images, the default and recommended setting. The right column was produced in PhotoShop by choosing File>Preferences>Display and Cursors>Color Channels in Color. Note: You cannot have both color and grayscale displayed as I have here this is a composite image I created for this tutorial. I am also not recommending that you change your preferences for showing the color channels in color. The grayscale is much easier to work with. I included this simply to present a visual image of what is happening on the color channels. Note how the grayscale images represent strong color with light gray. It may help to think of the channel images as a negative view of the color. In this image, there is a great deal of red, and very little blue. So what can the channels do for us? They can make selection easier and bad photos can often be saved by applying corrective effects to individual layers, but that is not the focus for this tutorial. Our interest in channels has to do with the Alpha 1 channel shown here, which you may note right away, is reflecting the selection in shown in the photo. After saying we were really not interested in the easy selection that channels can offer, I feel duty bound to tell you that this selection was almost instantly accomplished by using the magic wand selection with only the red channel active one day I will do a tutorial on selection and special effects using channels. The second sample at the left shows the red channel active. The original photo is unchanged, as shows with the RGB thumbnail, but since the red channel is active, all other information is hidden. As soon as you click back to the RGB setting, the full color photo will be displayed on the work area. It should be very clear from this view how selecting the outline of the child would be much easier with this view rather than with the full color view. Any selections made will apply to the active channel. To have it affect all color channels, simply activate the RGB channel. When you have a selection created in your document, you can either
save the selection to disk, or save it with the document. I will not
get into great detail here, since each program handles this feature
in a different way. That really is all you need to know about channels for this article (that wasn't so bad was it?). With that background, we can move on to specific programs and then to your new beginning using channels and masks to make your work faster forever. |
|
Masks Are Easy Part 2 Tutorial IndexMasks Are Easy Part 2 Start
|


 But
it is important to understand that when a selection is saved, it is
always represented as a channel. We will use this feature a lot over
the next few pages. At the right I have included a sample of the Alpha
1 selection from above. Alpha 2 is the same selection with a feathered
edge to show the grayscale representation in a channel. These mask looking
representations do not affect the appearance of the document at all
in this state. They are simply selections saved for future use. Do not
confuse a selection channel with a layer mask.
But
it is important to understand that when a selection is saved, it is
always represented as a channel. We will use this feature a lot over
the next few pages. At the right I have included a sample of the Alpha
1 selection from above. Alpha 2 is the same selection with a feathered
edge to show the grayscale representation in a channel. These mask looking
representations do not affect the appearance of the document at all
in this state. They are simply selections saved for future use. Do not
confuse a selection channel with a layer mask.
URL: https://www.webreference.com/graphics/
Created: Apr. 14, 2000
Revised: Apr. 14, 2000
 Find a programming school near you