Masks Are Easy Part 2 pg 10: Production Graphics with Wendy Peck at webreference.com
 |
Masks Are Easy Part 2: Masks for Flash | |
|
|
|
|
|
Right click on the movie above to play again. The still shot below shows the masking object which will reveal the text in the masked layer.
|
Masks in Flash are relatively simple in comparison to the graphic effects possible with the former examples. However, they have one great feature that can make the imagination run wild they move. Like all graphic masks, the Flash version works on hiding some things while letting others show through. In the sample at the left, the text was hidden by a mask and only allowed to show as the mask progressed across the word. Right click on the movie and choose play to watch the text appear. Flash masks only affect the layers linked directly to the mask layer. In the sample, only the initial text layer was affected by the mask. Unlike the other programs, where masks are based on a grayscale image, Flash masks are either on or off. A filled object on a mask layer lets the masked layer items show through. Unfilled areas do not show. The second image here is a shot of the masking object halfway across the first line. Play the movie again to see the effect. In this example, only the text is affected by the mask layer with the moving oval revealing the layer below. |
|
|
|
|
|
|
Sample masking movie. Right click and click on play to stop animation.
Shown here: Movie background, black text layer and yellow text layer placed directly over the black text. The mask will cover all of the yellow text layer except where there is a filled object with the setup shown at the right.
Masking object at initial position (above) and final position (below) .
Masking object shown above and the exact same view with the masking in effect. Note how the yellow test only shows the masking object is in that spot. |
To create a mask, first create the layer you would like to have masked.
Make sure that layer is selected and create a new layer. The layer will
appear above the selected layer. Place black text on one layer, and then the identical
text on a new layer, changing the text color to yellow. With the yellow
text layer selected, create a new layer called Mask. The new mask layer and the layer to be masked will appear with the layer locked. To edit the layer or mask, click on the lock to unlock. With the layers unlocked, you cannot see the effect for the mask. Draw the shape you wish to use as the mask, in this case a slightly flattened circle. Choose the first frame on the Mask layer and draw your initial mask shape and position. Make sure the shape is filled, as any area that is not filled will allow the layer below to show. Move to the last frame and insert a Keyframe. Click and drag the circle on the Mask layer to the other end of the text. Use your SHIFT key as you move the circle this will keep the masking object in the same vertical position as you move it. Create a Motion Tween between the first and last frame on the Masking layer to complete the mask layer. The samples at the left show the results for the first frame and the last in the movie. The black circle will be the only portion of the yellow text layer that will show. Test your movie. If you do not have your layers locked, the masking result
will not show. The sample shown here is an example of the exact same
view with layers unlocked (top) and then locked, showing the results
of the masking. Note how the yellow text only shows where the circle
is present, while the black shows at all times, since it is not affected
by the mask layer. You can set your masking layer to affect more than one layer. In the sample below, I have dragged the black text layer (Bl Text) under the Mask layer. See the setup at the right. I also moved the text to form a shadow. Note how the black text layer now only shows when the mask object is over that portion of the layer. Masks in Flash are very simple, though it can be confusing to keep track of all the layers and what is masking what. Working cleanly is the secret though. Make sure that you name your layers with meaningful names, and take those extra organizing steps to keep your work pristine clean. |
|
|
|
|
|
| Photos © Tom Thomson Photography. Used with permission. | That's the end of our mask exploration for now. Make sure you see Part 1 if you have not already. In the future, I will be back to masks they are too powerful not to keep revisiting. In the meantime, make sure you incorporate masks when you can. There may be other ways to accomplish a look, but learning to use masks will advance your graphics work more than any other single technique. Work hard, but make sure you have some fun! | |
|
|
Text as DesignMasks Are Easy Part 2 Start
|


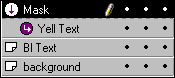 This
layer will become the masking layer. Right click on the new layer and
choose Mask from the pop-up menu as shown on the left. The results will
be similar to the sample shown here.
This
layer will become the masking layer. Right click on the new layer and
choose Mask from the pop-up menu as shown on the left. The results will
be similar to the sample shown here. 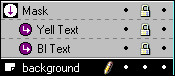
 Wendy
Peck is a working Web designer and writer living in NW Ontario, Canada.
Wendy
Peck is a working Web designer and writer living in NW Ontario, Canada.
URL: https://www.webreference.com/graphics/
Created: Apr. 16, 2000
Revised: Apr. 19, 2000
 Find a programming school near you