Dingbats pg 5: Production Graphics with Wendy Peck at webreference.com
 |
Dingbats 5: PhotoShop Actions | |
|
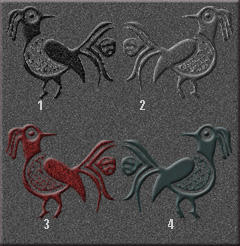
Variations of Zapatec font with the same Action as used for the Mesoglyphs set. To create the background I filled a layer with dark gray, and set the foreground color to grey, the background to white, and ran the Action. A tile effect resulted, though it is easy enough to cancel the layer effects for a plain background. The variations foreground colors are (in numerical order) black, white, brick, teal. Background for all was white. Zapatec and Mesoglyphs dingbat fonts © The Scriptorium. Used with permission.
|
Actions record a series of steps, saving them to be used over and over. I am never sure exactly what I will be doing - inspiration can hit along the way, so I create the first graphic before creating the action. Although it is duplication, you will work through the steps very quickly. Actions record every step you make, so you do not want to be changing your mind while recording. With complicated steps, it is a good idea to keep a notepad handy to mark what values you applied. You can also use the history window to trace back what you have done. A single click on a previous command will temporarily restore the document to that point. Check your settings and make note of them. I have included a series of graphics from the Mesoglyphs dingbat font. Creating the first graphic and the Action took me more than 30 minutes and many experiments to get exactly the look I wanted. The rest of the samples took under 10 minutes in total to create. Two examples from the main set are below. The sample on the left is the same Action, but with different colors and font. You can see more samples of the main set and variations, as well as a copy of the Action on another page. Full Meso set.
|
|
 |
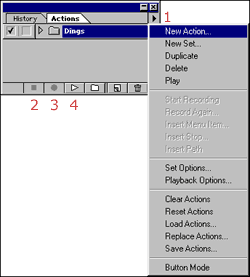
Create an ActionOpen the Actions window. Create a Set (folder) to hold your Action(s). Click on the menu flyout at the top right of the screen (1). Choose New Set for a new folder. Name your Set. You should think out where you would like to have your Action begin. For the African set, I obviously wanted the Action to start after I had chosen my character. I also wanted the freedom to choose the color before the Action began. I chose to start recording immediately after I had placed my text in the correct color and chosen the second color (for this action, both the foreground and background colors are used.) To create your Action, ensure that the Set is highlighted and choose New Action. Again, you will be prompted for a name. My action for this set is called African. Click OK and the Action will start recording every setting you change. To end the recording, click the Stop Playing/Recording button at the bottom of the Action window(2). (Pause the recording by clicking the Stop Playing/Recording button. To resume, click on the Begin Recording button (3).) When you have finished recording, save your Action. Highlight a Set (folder) and open the flyout menu. Choose Save Actions and define a location to save the set. To play the actionWork to the point where the Action will take over. In the sample, I placed my dingbat with the correct color and made sure the background color was correct. Highlight the Action you wish to use and click on Play Current Selection (3). You can watch the program move from one step to the next. You can stop the action by clicking the Stop Playing/Recording button and resume with the Play Current Selection. Learning to use Actions will save you an enormous amount of time over the long run. You can create Actions with stop points to allow you to enter steps that will vary, so the range of what can be accomplished with Actions is endless. If you find yourself doing repetitive steps, look to Actions. |
|
Dingbat Tutorial IndexDingbat Tutorial Start |
URL: https://www.webreference.com/graphics/
Created: Jan. 20, 2000
Revised: Jan. 23, 2000


 Find a programming school near you