Dingbats pg 4: Production Graphics with Wendy Peck at webreference.com
 |
Dingbats 4: PhotoShop | |
|
 |
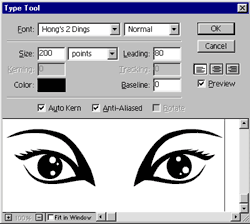
Create a new document (RGB mode). I like to work with plenty of space even when creating small graphics - often 550px by 400px. Choose the Text tool and click to open the text dialog box. Select your Dingbat font - this is Hong's 2 Dings, character "E". Set the size much larger than you would with text - I often use 150 to 250 pt. You can always reduce the size, but make sure it the resulting character is at least as large as your finished graphic. Choose your color, and click OK. Leading and tracking does not matter. If you need more than one character, I recommend creating each one separately. Duplicate the layer. You may wish to make the original layer invisible, but it is a good idea to keep a copy of the original. When working with filters and effects, sometimes you may wish to start over. Other times, you can use the original layer to create to the final look. In the example here, the original black layer creates the outline effect. Render the working layer (Layer>Type> Render Layer in the menu or right click (Option Click) on the T in the layers window. Choose Render Layer. Your dingbat is now a graphic element and cannot be edited as text. Apply filters or effects to create the look you want. In this sample, I applied a Radial Fill from teal to red. Using Layers> Effects, I applied an Inner Shadow and then a mild Gaussian Blur filter. A Drop Shadow with default values, but Blur set to 12, completed the effect. The original black dingbat layer provides the black outline. To bring the eyes closer together, I rendered the original text layer and merged the working layer with the original. I selected one eye and moved it closer, cropped, and resized the image. Once you have rendered the dingbat, all options, including those not available for text can be used. Use PhotoShop Actions to instantly create an entire set of consistent graphics from your Dingbat font. Continue to the next page for more information. |
|
Dingbat Tutorial IndexDingbat Tutorial Start
|
URL: https://www.webreference.com/graphics/
Created: Jan. 20, 2000
Revised: Jan. 22, 2000
 Find a programming school near you