Dingbats pg 7: Production Graphics with Wendy Peck at webreference.com
 |
Dingbats 7: CorelDraw Part 2 | |
|
|
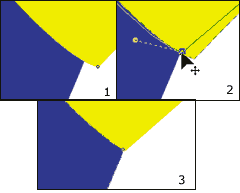
Once your dingbat has been converted to a graphic image, the real power of working with vectors begins. In the illustration, the image on the left is in text form (Hong's Dings 2, character "m"). The font was converted to curves with Break Apart applied. The brush section was severed from the handle with the knife tool, and a fountain fill added to the handle and the brush highlight. Each of the stars became a separate object, easy to fill from the color palette or the Fill Tool in the Toolbar. The highlight star was removed since the fountain fill provides the illusion of light. Here the Knife Tool is used to slice the handle from the brush. (The outline has been filled with yellow temporarily for easy visibility.) In the second illustration, the brush is filled with blue - it is now a separate object. At times, when using the knife tool, or just converting to curves, lines will not meet perfectly (1). Choose the Shape Tool from the Toolbar to move nodes or lines. Click and drag on nodes to correct (2). This method can also be used to customize the shape of any vector object. Look to this solution when your dingbat is not quite the shape you require - much faster to edit an image that is close to what you want than to start from scratch. This is an extreme close-up of the brush meeting the handle from the above sample. I removed many nodes along the connecting line on both the brush and the handle object. For working speed, I do not concentrate on perfection when I am creating the initial break, cut or construction line. I have found it much more efficient to approximate what I need, and use the shape tool to refine. By moving nodes you can get exact results (3). That is all you really need to know to start turning dingbats into your own work. Find an inspiring dingbat font see what you can do with these simple outlines. Don't forget to let us know what you have done. Send URLs, files, etc. to wpeck@internet. com. |
|
|
Exported directly to 72 dpi JPG from CorelDraw: 9.62kb
Exported from CorelDraw at 300 dpi in TIFF format. Opened in PhotoShop to reduce resolution and optimize: 9.63kb
Hong's Dingbat 2 ©Hong Li. Used with permission. |
CorelDraw Tips for Web PublishingOccasionally, I find that CorelDraw exports to Web formats are a little under perfect quality (although the JPG export compression is wonderful). This is usually for complex drawings, especially with visible outlines or some fountain fills. Other times, it makes sense to do your color changes and object scaling, etc., in CorelDraw, but move to a full featured photo manipulation program to add texture and effects. You will get much better results with the following method. Export in a high resolution in TIFF format. Open the export in PhotoShop or PhotoPaint, apply your changes and then reduce the resolution. You can often pull off the impossible with this routine. The illustration here (Hong's Dingbats 2, character "f") is a tough one to deliver with quality at 72dpi. The top image is directly through CorelDraw JPG export, and while it has delivered the fountain fills quite well for an image under 10K, the outline is breaking. In the bottom example, I exported the image at 300dpi in TIFF format. It was then opened in PhotoShop, where the resolution was reduced to 72 dpi and optimized. The files are nearly exactly the same size. Most images will be fine straight from CorelDraw, but this is a great trick to have in your basket for those tough graphics. For a complete set of step-by-step tutorials for the most important features in CorelDraw, see my CorelDraw 9 Basics series. |
|
|
|
Dingbat Tutorial IndexDingbat Tutorial Start
|


URL: https://www.webreference.com/graphics/
Created: Jan. 20, 2000
Revised: Jan. 22, 2000
 Find a programming school near you