Dingbats pg 3: Production Graphics with Wendy Peck at webreference.com
 |
Dingbats 3: Working with Dingbats | |
|
Bevel and Emboss Layer Effects in PhotoShop brings the font to life (Roughworks, "F"). "Construction" lines are extended and will be "borrowed" for navigation lines through the site. |
Creating the graphics for a project is probably the most fun and rewarding for me, but if I am going to break my time budget, it will almost always be in this area. I have had many discussions about this with other designers I am not alone. It seems, though, that the secret for many of us lies in gathering a wealth of shapes, concepts and outlines as reference and inspiration. Dingbats can be a useful tool for prompting creativity and reducing creation time. Dingbat shapes offer a partially formed canvas for designers to experiment with layout and graphic concepts. They are perfect for navigation bar outlines or components, section identifying visual marks, page dividers and texture backgrounds. Some designers use dingbats often in logo design. Dingbats are low priced, easy to access and versatile. Any graphic designer already has the software to create graphics from a dingbat font. Design elements to go! Need I say more? |
|
|
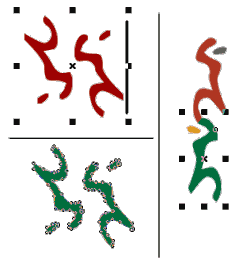
CorelDraw Dingbat variations
Adobe Illustrator variations
|
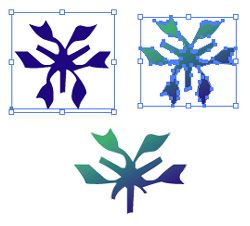
General TechniquesThere are two program types for working with dingbats as graphics: Paint programs like PhotoShop, Corel PhotoPaint or PaintShop Pro and vector programs like CorelDraw, Illustrator and Freehand. Any program that will take a symbol and convert it to curves or render it from text will work. In all programs your starting point is to select the dingbat font and type the chosen character. In vector programs, you must convert the font to curves. In this CorelDraw sample (Zone 23, Foopy 4, character "d") the upper left image is still in text form. Note the cursor behind the character. In the lower left image, the text has been converted to curves as indicated by the nodes along the curves. Finally, the right image has been converted to curves and then separated. Note how each separate piece has a different color, and has been rotated and repositioned. The selection handles indicate that only a portion of the image is selected. This is a very simple example of what you can do with one character. What was a design element now takes on a loose human form. The Illustrator sample here (Zone 23, Foopy1, character "m") shows the dingbat first as text at the left, with "Create Outlines" applied on the right and with portions of the image removed in the lower sample. In PhotoShop, you must convert the text in order to use filters. Type
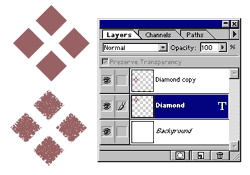
your character (Wingdings, character "v") and render the layer.
The illustration shows the upper image on the Diamond layer, still in
text form. The lower image is on Diamond copy
|
|
|
Foopy 4 © Zone 23 Fonts. Used with permission. Roughworks © Scriptorium. Used with permission. |
Dingbat Tutorial IndexDingbat Tutorial Start
|

 which
has been rendered. The glass filter provided the rough edges and I added
noise for texture - options not available for text. You should set approximate
desired size and color before rendering the text layer.
which
has been rendered. The glass filter provided the rough edges and I added
noise for texture - options not available for text. You should set approximate
desired size and color before rendering the text layer.
URL: https://www.webreference.com/graphics/
Created: Jan. 19, 2000
Revised: Jan. 22, 2000
 Find a programming school near you