Graphic Lifts pg 2: Production Graphics with Wendy Peck at webreference.com
 |
Graphic Lifts: Texture and Repeating Elements | ||||
|
An aside For simple designs with color as the main design element, I may never enter a raster program just export from my vector program. Of course, if I need to add dimension or texture, off it goes to a raster program, usually as individual elements for treatment. Occasionally, I do transfer the entire layout to the raster program, but that is unusual.
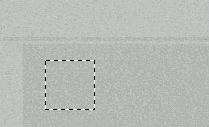
Use a fixed selection size to define a pattern or create a background tile. Technically, you can use a very small sample and achieve a textured tile, but it is usually best to select at least 50px by 50px, more if the texture compresses well.
Text as selection used to create textured text. Create a new layer and fill the selection with a textured pattern. This is a magnified view of the texture. |
We've all seen, and perhaps
been repelled by, background texture. Some circa 1997/98 Web backgrounds
may end up in virtual museums that our grandkids will find inspiring,
but , thankfully, we have moved past background mania. The trend, certainly
in commercial sites, is plain, plain, plain, broken occasionally by a
drop shadow or two.
But keep an eye on the leading edge of commercial sites. There is texture there. Maybe it never went away, or maybe it is entering a rebirth period, in a much more subtle form. I think we will see more and more creative use of texture that enhances navigation and communication, rather than detracts. One of the ways you can make sure that your texture or background is an integral part of your page is to use repeating elements. If you are new to design, and wish to stretch your abilities, repeating texture in more than one element of the page is a fairly safe way to get your feet wet. It is not the only way to create a dynamic and balanced page, but it is easier to work with, and your visitor's eye will accept it willingly. Take a look at the sample to the left. I created this in Photoshop with nothing but a gray fill and the noise filter. The top sample shows a JPG file exported as a finished item. The second sample is in a table with a dark background created from the original graphic. A nested table sports the lighter background. I am not proposing that you should fill your pages with nested tables, but rather wanted to illustrate how you can create graphic elements to serve your design in both graphic and HTML form. Below the table is text that has been filled with the lighter pattern, shown on the darker background, and on white. Finally, a 4px line is created as a design element to use throughout the page. There is a plain version and one with a bevel and drop shadow added. Both can be used in the same page, and you may even find a very narrow line quite useful. In all the samples on this page, the bevel and drop shadow distance, blur, and opacity settings have been severely reduced from the default values subtle is the look we are working with. I have used this simple example, but the methods for creating repeating elements are most often the same. Of course, you can just do your design in a graphic program and slice, but I find that many of the sites I do (which tend to be information or product sites) are faster to put together as HTML pages. This is where repeating elements really pay their way. Raster program You can also define a pattern and fill selections to create new elements. Make sure you are placing the new elements on separate layers, since you may need to export only that element. Creating text with the texture from any part of your design is also easy. Define a pattern from the area of the composition you wish to repeat. Create your text using the Text as Selection feature and fill with the pattern. Hint: You may wish to save your pattern for future use or create a tile for future use. See Rough it Up for Photoshop and PaintShop Pro step-by-step directions to create and save background tiles. To save a pattern see Let There Be Lines for Photoshop and PaintShop Pro directions. This sample is intended to be used as just that a sample of a technique. You could be working with a totally different look and use the same methods. Other tools in your repeating elements arsenal are the Eyedropper tool for consistent color and any tool that will paint (or stamp) with a pattern. Want to have some real fun? Create a layer mask and fill with your texture. You can add very subtle touches when you use the same texture to block out part of the preceding layer. See Masks are Easy, Really for the full step-by-step instructions for using masks. Next we will look at repeating elements in vector programs. |
||||
Graphic Lifts Tutorial IndexGraphic Lifts Start
|


URL: https://www.webreference.com/graphics/
Created: July 20, 2000
Revised: July 20, 2000
 Find a programming school near you