Let There Be Lines pg 7: Production Graphics with Wendy Peck at webreference.com
 |
Let There Be Lines 7: PaintShop Pro Grid/Scan Lines/Dots | |
|
|
|
|
 |
Grids and scan lines are created in much the same way in PaintShop Pro. We are going to use a precise selection method to create quick and easy grids of any size or style. The scan line selection is not as crucial, but follows much the same method. Refer to the PhotoShop examples earlier in this article for variations. Look to the bottom of the page for dotted lines, too. | |
|
|
|
|
|
|
Create a Grid
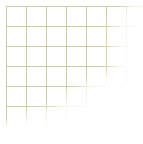
Click OK and you will see a square selection near the upper left corner.
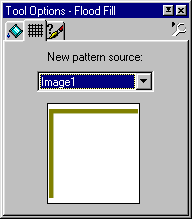
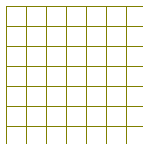
To create the pattern, select the Fill tool. Open the Fill Tool Options window and choose Fill Style Pattern. Click on the second tab to specify the pattern source. Choose the pattern source from a selected area or an entire file from any open document. (See PhotoShop Grids to save this pattern for future use.) Select the document containing the pattern selection and the pattern will appear in the preview window. This pattern is now active. Select the area you wish to fill and click the Fill tool in the area. You now have a grid.
|
|
|
Original image.
Scan lines applied and Layer Opacity 34%. |
Scan Lines Open a photograph. Create a new layer in the Layers Option window. Choose the Flood Fill tool. In the Flood Fill Options window, choose Fill Style>Pattern. Click on the center tab and choose the file you saved above as your New Pattern Source. Make sure the new layer is active and click in the document. The new layer will fill with the striped pattern. Reduce the Layer Opacity until you are happy with the result. Experiment with other effects, like using Soft Light, or adding noise for a different look. For convenience, I have included a file of the pattern as described above. This file will work for PaintShop Pro 5 and above. Download file.
|
|
|
|
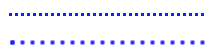
Dotted Lines
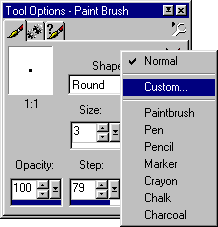
Select the Brush tool. Open the Paint Brush Options menu and select
the fly-out menu near the top right of the window. Choose custom to
open the Custom Brush window. Choose Create and your selection will
be turned into a new brush. Return to your document. Make sure nothing is selected and set your foreground color. Test your brush to see if the dot spacing is correct and adjust if needed. That's itany shape, any spacing. You set what you want. As I mentioned, there are other ways to get here, but this one gives you total control. Have fun with it. |
|
|
|
Let There Be Lines Tutorial IndexLet There Be Lines Start
|
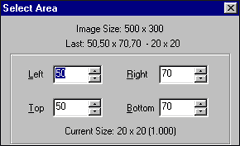 Double
click on the Selection tool to open the Select Area window. This feature
allows us to place precise selections. I don't like working in the extreme
corners of a document, so have chosen 50 pixels from the top and the
side of the document as my starting point. I want to create a selection
that is exactly 20 by 20. So my left setting is 50, or 50 px from the
left border. I need 20 pixels for the selection width, so 50+20=70 for
the right setting The same numbers are used to create the vertical settings.
Double
click on the Selection tool to open the Select Area window. This feature
allows us to place precise selections. I don't like working in the extreme
corners of a document, so have chosen 50 pixels from the top and the
side of the document as my starting point. I want to create a selection
that is exactly 20 by 20. So my left setting is 50, or 50 px from the
left border. I need 20 pixels for the selection width, so 50+20=70 for
the right setting The same numbers are used to create the vertical settings.
 (So
now you are wondering why on earth I would go to that trouble. Be patient
for a few more sentencesit will all make sense.) Fill the selection
with your chosen grid color. Now, double click on the Selection tool
again to open the Select area window.
(So
now you are wondering why on earth I would go to that trouble. Be patient
for a few more sentencesit will all make sense.) Fill the selection
with your chosen grid color. Now, double click on the Selection tool
again to open the Select area window.  We
want to move the selection one pixel to the right and one pixel down.
Enter Left 51, Right 71. Top 51, Bottom 71 and click OK for a result
that looks like this.
We
want to move the selection one pixel to the right and one pixel down.
Enter Left 51, Right 71. Top 51, Bottom 71 and click OK for a result
that looks like this.  Delete
the contents of the selection. The remaining portion is the half cell
of the grid I promised earlier. We will move the selection back to the
original position and create a pattern. To move the selection to the
start point, double click on the
Delete
the contents of the selection. The remaining portion is the half cell
of the grid I promised earlier. We will move the selection back to the
original position and create a pattern. To move the selection to the
start point, double click on the  Selection
tool. Enter the starting values, Left 50, Right 70, Top 50 and Bottom
70. Total precision.
Selection
tool. Enter the starting values, Left 50, Right 70, Top 50 and Bottom
70. Total precision. 
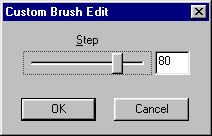 The
brush will be placed at the end of the custom brushes and will be selected.
Choose Edit to open the Custom Brush Edit window. Increase the Step
value. You can select or edit this brush at any time by choosing the
custom brush option.
The
brush will be placed at the end of the custom brushes and will be selected.
Choose Edit to open the Custom Brush Edit window. Increase the Step
value. You can select or edit this brush at any time by choosing the
custom brush option.
URL: https://www.webreference.com/graphics/
Created: Mar. 15, 2000
Revised: Mar. 16, 2000
 Find a programming school near you