Let There Be Lines pg 6: Production Graphics with Wendy Peck at webreference.com
 |
Let There Be Lines 6: Line Effects in PaintShop Pro | |
|
|
|
|
|
|
You can create most of the same effects described in the previous pages with PaintShop Pro, although the methods are different. I will go through the methods, but to conserve space, see the PhotoShop pages for variation ideas. |
|
|
The blue lines are 1 px thick, created with anti-aliasing turned off. Drop shadows added with the Drop Shadow effect. Top: Opacity 30%, Blur 2, Vertical Offset 2, Horizontal Offset 2. Bottom: Opacity 30%, Blur 3.3, Vertical Offset 3, Horizontal Offset 1. |
Create Lines and Shadows Draw a 1 px line with anti-aliasing turned off. Select the Magic Wand and click on the line to select. Choose Image>Effects>Drop Shadow from the main menu to open the Drop Shadow window. Choose the opacity, which will usually need to be lowered for fine objects. I have used 30% for the samples at the left. Choose the blur amount, again using a small value. The first line here has a blur of 2, with the second one at 3.3. You will want a small offset. Here I have used 2 and 2 for the first line and 3 and 1 for the second. Experiment until you get the appearance you desire. |
|
|
1 px lines with graduated fill.
2 px lines with graduated fill. |
Graduated Lines If you are making many lines, you may wish to save your line selection.
|
|
|
|
Let There Be Lines Tutorial IndexLet There Be Lines Start
|

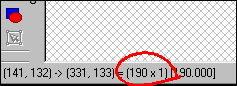 Click
and drag to create the correct size for your line. The line represented
here by the status bar information is 190 px by 1 px.
Click
and drag to create the correct size for your line. The line represented
here by the status bar information is 190 px by 1 px. 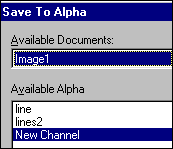 When
your selection is correct, choose Selections>Save to Alpha Channel
to open the Save to Alpha window. Double click on New Channel and give
the selection a name you will recognize. Click OK. To use the selection
again, create a new layer and choose Selections>Load from Alpha Channel.
The selection will appear exactly as the one you saved.
When
your selection is correct, choose Selections>Save to Alpha Channel
to open the Save to Alpha window. Double click on New Channel and give
the selection a name you will recognize. Click OK. To use the selection
again, create a new layer and choose Selections>Load from Alpha Channel.
The selection will appear exactly as the one you saved.
URL: https://www.webreference.com/graphics/
Created: Mar. 15, 2000
Revised: Mar. 16, 2000
 Find a programming school near you