Let There Be Lines pg 2: Production Graphics with Wendy Peck at webreference.com
 |
Let There Be Lines 2: PhotoShop Lines | |
|
|
|
|
|
|
OK, Wendy. So you select the line tool and set your foreground color. In the Line Options window, set line thickness and turn off anti-aliasing. Click and drag with your SHIFT key pressed, and you have a line. We need a whole section of this tutorial for this? Well, yes we do. If I was really to let my imagination run free, I would need the entire tutorial for this subject, but we have other programs to cover. |
|
|
|
|
|
 All red lines are 1 pt with anti-alias turned off. Shadow line settings: |
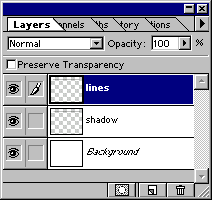
The instructions above tell the whole story to create a plain line in PhotoShop. But as valuable as a plain line can be in design, that is just the beginning. Suppose you want to add a little depth to your page by placing a drop shadow under your line. Try creating a hairline and adding a shadow with the Layer Effects. Pretty dismal? No matter how much you tweak the settings, you do not get a subtle 3D appearance. Try this manual shadow method for much more control. On a new layer
(lines), create several 1 pt lines, with anti-aliasing turned off. Create
a new layer (shadow), and move it below the lines layer. |
|
|
1 pt line with graduated fill, selected with the fixed size marquee option for accuracy.
Identical 2 pt graduated fill lines with varying end points for fill.
|
Filled Lines
Fill with any color or graduated fill. The samples shown here all have the same selection size and identical graduated fill, but the fill is set with slightly different positions and end points. I have shown a sample of a preset selection above. Imagine trying to select this without the power of a fixed size marquee. Carry on to the next page to learn how to use filters for lines, and the ever popular dotted line. |
|
Let There Be Lines Tutorial IndexLet There Be Lines Start
|
 Change
your foreground color to gray. Set the line tool to anti-alias. With
the Shadow layer active, draw a shadow line one pixel under the original
line. Repeat using different line widths, settings, etc., until you
find an effect you like. See under the illustration for the settings
used in the sample. With the shadow layer still selected, and the Move
Tool active, use the Right Arrow key on the keyboard to move the layer
one pixel to the right (or as page light direction dictates). Merge
the lines layer with the shadow layer when you are satisfied with the
result.
Change
your foreground color to gray. Set the line tool to anti-alias. With
the Shadow layer active, draw a shadow line one pixel under the original
line. Repeat using different line widths, settings, etc., until you
find an effect you like. See under the illustration for the settings
used in the sample. With the shadow layer still selected, and the Move
Tool active, use the Right Arrow key on the keyboard to move the layer
one pixel to the right (or as page light direction dictates). Merge
the lines layer with the shadow layer when you are satisfied with the
result.
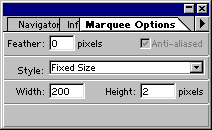 To
start, let's look at the fixed size marquee function. Double click the
Rectangle Marquee tool to open the Marquee Options window. Choose Fixed
Size for the style and enter the desired size of your line. Click where
you would like to place the top left corner of your line and a marquee
will be placed according to the dimensions you specified.
To
start, let's look at the fixed size marquee function. Double click the
Rectangle Marquee tool to open the Marquee Options window. Choose Fixed
Size for the style and enter the desired size of your line. Click where
you would like to place the top left corner of your line and a marquee
will be placed according to the dimensions you specified.
URL: https://www.webreference.com/graphics/
Created: Mar. 15, 2000
Revised: Mar. 15, 2000
 Find a programming school near you