Text as Design pg 8: Production Graphics with Wendy Peck at webreference.com
 |
Text as Design 8: Flash Outlines and Graduated Fills | |
|
|
If you have followed the previous page step-by-step, your text is still text, although the characters are split into many layers. However, if you require an outline, or a graduated fill, you will have to convert the text.
|
|
|
Choose a preset graduated fill
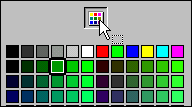
Open Color window to set custom graduated fill
|
Graduated Fill Graduated colors can be set by clicking on the Fill Color button, just below the toolbox. The color palette will open. You can choose a preset graduated fill at the bottom of this window. To create a custom graduated fill, click on the tiny button at the top of the color palette to open the Color window. Choose the Gradient tab. Click on the preset fill that is closest to the custom fill you desire. You can change all attributes, so do not be concerned if there is nothing close to what you desire. Click on New to create a new fill. A new sample will appear. Choose Radial or Linear from the drop down menu.
|
|
 |
You can also set where the color change will occur. Slide any color tab to achieve the effect you desire. Note the preview window next to the preset choices. Once you are happy with your choice, click Change and the new icon that was created when you started will change to the new settings. You can work with the Color window open for easy editing, or close the window with the x at the top of the Color window. The color on the main screen should be your new preset color. You can access the new color you created at any time through the color palette window. Your custom graduated fill will be displayed with the other presets. To delete a preset fill, open the Color window if necessary and select the fill you wish to delete. Click the Delete button. With your new preset graduated fill showing on the color button, choose the Paint Bucket and click on the object you wish to fill. Have some fun with text in Flash. Creative text and simple animation can bring great life to your page. |
|
|
|
Text as Design Tutorial IndexText as Design Start
|
 To
add an outline, choose the Ink Bottle Tool. Set the Line Thickness and
Line Style to desired settings. Choose the color for your outline. Click
on a character and the outline you specified will be applied.
To
add an outline, choose the Ink Bottle Tool. Set the Line Thickness and
Line Style to desired settings. Choose the color for your outline. Click
on a character and the outline you specified will be applied.  To
change the outline, simply set new attributes and click again. The new
outline will replace the original.
To
change the outline, simply set new attributes and click again. The new
outline will replace the original. 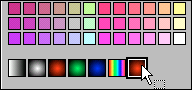
 To
change the color at the left edge of the fill (or center for radial
fill), click on the left tab (white in this sample). Note that the tab
is now depressedit is often hard to see this, but you can confirm
that it is selected by the color shown above the Change button. This
is always the active color.
To
change the color at the left edge of the fill (or center for radial
fill), click on the left tab (white in this sample). Note that the tab
is now depressedit is often hard to see this, but you can confirm
that it is selected by the color shown above the Change button. This
is always the active color.  Click
on the color button to select a new color. You can also set the transparency
of this color with the Alpha slider at the right of the screen. Choose
your desired color, and repeat for the right tab (right side of linear
fill and outer edge for radial fill).
Click
on the color button to select a new color. You can also set the transparency
of this color with the Alpha slider at the right of the screen. Choose
your desired color, and repeat for the right tab (right side of linear
fill and outer edge for radial fill). If
you want to add another color, click and drag on the black tab to the
left of the color bar. To remove the extra color, click and drag off
the bar to the left.
If
you want to add another color, click and drag on the black tab to the
left of the color bar. To remove the extra color, click and drag off
the bar to the left.
URL: https://www.webreference.com/graphics/
Created: Feb. 17, 2000
Revised: Feb. 17, 2000
 Find a programming school near you