Text as Design pg 3: Production Graphics with Wendy Peck at webreference.com
 |
Text as Design 3: Outline for ImpactCorelDraw/Fireworks | |
|
Calligraphy outline converted to an object. Both fill and outline have fountain fills for a subtle, but rich look. |
CorelDraw has very powerful outline tools. The calligraphy effect shown here is easy to apply to any object, including editable text, and adds a lot of interest to an outline. This sample has very wide outline with a strongly angled calligraphy setting. Both the fill and the outline have graduated fill.
To create an outline with a graduated fill, select your text and choose
Arrange>Convert Outline to Object from the Main Menu. The outline
will become a separate object that can be filled with any of the Fill
tools. Experiment with the outline capabilities in CorelDraw. Outlines can be filled with texture and bitmap fills in addition to any fountain fill. There are countless dramatic and creative text outline treatments just waiting for you to discover. |
|
|
Simple outline with no fill and a slight drop shadow creates a very gentle effect.
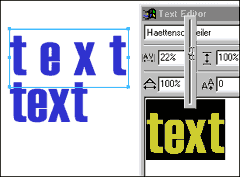
Increasing spaces between characters with the kerning setting. The lower blue sample is the default, with the 22% kerning shown above.
|
Macromedia Fireworks To create text, choose the Text Tool from the Toolbox. Click on the canvas to open the Text Editor window. Type in your text. Choose your fill color, font and font size. For the lighter look of the wireframe example, I opened the kerning by about 10%. This is shown in the illustration (left). Move the slider and check the canvas to see the results. The example here shows the lower text on the canvas with the default kerning values. The upper sample reflects the changes in the Text Editor window. When outlining text, you often want a little more space to make up for the visual weight of the stroke.
Spend some time trying different Stroke and Fill combinations, and make sure you try adjusting the default settings for each stroke.
|
|
|
|
Text as Design Tutorial IndexText as Design Start
|

 The
above instructions will give you an even outline with a solid color.
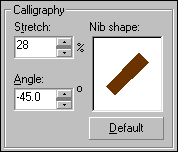
To apply a calligraphy outline, set calligraphy settings in the Outline
Pen window (open as above). The settings shown here will give the approximate
appearance of the sample.
The
above instructions will give you an even outline with a solid color.
To apply a calligraphy outline, set calligraphy settings in the Outline
Pen window (open as above). The settings shown here will give the approximate
appearance of the sample. 
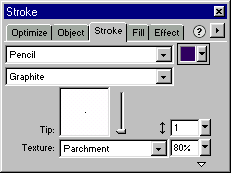 When
you have your text as you want it, open the Objects window if it is
not open. Choose the Stroke tab to access the Stroke options. The settings
used for the wireframe sample are shown here. To finish this effect,
add a drop shadow by clicking on the Effect tab. This shadow is created
with Distance 5, Softness 2, Opacity 63% and default color.
When
you have your text as you want it, open the Objects window if it is
not open. Choose the Stroke tab to access the Stroke options. The settings
used for the wireframe sample are shown here. To finish this effect,
add a drop shadow by clicking on the Effect tab. This shadow is created
with Distance 5, Softness 2, Opacity 63% and default color.
URL: https://www.webreference.com/graphics/
Created: Feb. 15, 2000
Revised: Feb. 15, 2000
 Find a programming school near you