Text as Design pg 2: Production Graphics with Wendy Peck at webreference.com
 |
Text as Design 2: Outline for ImpactPhotoShop/PSPro | |
|
|
Outlines provide one of the fastest ways to add life and style to text. Even a simple 1px line around your characters will make them stand out from other graphics and add a crisp look. Experiment with wider outlines, which can give your text an interesting two-toned effect. A couple of simple steps will create this look in any graphic program. Here we have PhotoShop and PaintShop Pro with Fireworks and CorelDraw methods on the next page. You will probably want to glance at all methods, since different styles are used for each one. |
|
|
Notice how the outlined text seems to have more contrast, yet the black outline does not alter the tonal quality
Selection still active and has been outlined with a 1px black outline. |
PhotoShop Method 1 This method does not allow for any text editing though, as the text is presented as a simple selection. Method 2 |
|
|
Two samples created in PaintShop Pro. These are identical samples except that the top sample has been separated into individual characters.
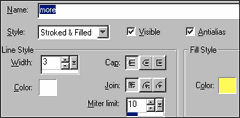
Vector Properties Window |
PaintShop Pro Create your text: Choose the Text Tool and click on the canvas. Enter your text. Choose the size and color in the Text Entry window. Choose Vector in the Create As section. Choose the Vector Selection Tool from the Toolbox. Right click on your text and choose Convert Text to Curves. Select As Single Shape if all characters will have the same fill and stroke. Choose As Character Shape to edit individual characters. Double click on your text to open the Vector Properties window (shown at left). Choose Stroked and Filled from the Style drop down for the effects shown here. Click on Color in the Fill section to set fill. Set outline width and color in the Line Style section. Click OK to finish. Repeat for each character, or select multiple characters (hold your SHIFT key down while selecting) if you chose to create individual characters. |
|
Text as Design Tutorial IndexText as Design Start |
URL: https://www.webreference.com/graphics/
Created: Feb. 15, 2000
Revised: Feb. 15, 2000


 There
are two routes to outlining text in PhotoShop. The fastest is to create
your text using the Type Mask Tool. Select Edit>Fill or use the Paint
Bucket Tool to fill with the foreground color. To stroke, change the
foreground color to your stroke color and select Edit>Stroke from
the Main Menu. Choose the width and position for your stroke in the
Stroke window. Click OK to complete. Quick Tip: Set your foreground
and background to the fill color and outline color. You can toggle between
the two to fill and stroke.

 Find a programming school near you