CorelDraw 101: All About Fills
 |
CorelDraw 101: All About FillsFill Tool Overview |
|
|
|
Understanding Fill Types The illustration to the left contains a selection of CorelDraw fill types. The background square contains a bitmap fill; the circle, a graduated radial fill; the rectangle, a solid color fill; the star a texture fill and the text a linear fountain fill. These are basic applications of each fill type, and each is covered in a step-by-step process in this series. This simple example gives just a glimpse of CorelDraw's powerful fill options. |
|
|
|
||
|
|
Solid Fill Overview Uniform, or solid fills are the most basic CorelDraw fill. Select an object with the Pick Tool (create one if necessary). Click in the color palette with an object selected to fill. You can also use the Uniform Fill dialog or click and drag a color from the color palette. Both methods are described in the Solid Fill Topic in this article. |
|
|
|
||
|
|
Fountain Fill Overview The illustration to the left shows the four basic types of fountain fills. The top row features a linear and a radial fountain fill. The bottom row contains conical and square fountain fills. The fills to the left are accomplished by selecting an object with the Pick Tool, clicking on the Fill Tool to open the fly-out. Click on the second icon to open the Fountain Fill window. All fountain fills are completed from this window. See the Fountain Fills tutorial in this series. |
|
|
|
||
|
|
Bitmap Fill Overview Bitmap fills put pictures inside your objects. Use the fill editor to create simple fills on the fly, or import your own bitmap file. The text and oval to the left contain bitmap fills, the light star has a preset 2 color pattern fill and the dark star a preset full color pattern fill. These fills are accomplished by selecting an object with the Pick Tool, clicking on the Fill Tool to open the fly-out. Click on the third icon to open the Bitmap Fill window. See the Bitmap Fills tutorial in this series. |
|
|
|
||
|
|
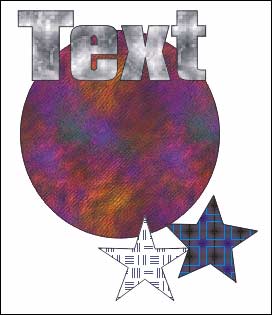
Texture Fill CorelDraw's Texture Fill puts the power of a texture editor at your fingertips. Hundreds of preset textures can be edited both randomly and through precise settings, resulting in millions of possible texture fills. Texture fills are accomplished by selecting an object with the Pick Tool, clicking on the Fill Tool to open the fly-out. Click on the forth icon to open the Texture Fill window. See the Texture Fills tutorial in this series. |
|
|
|
||
|
|
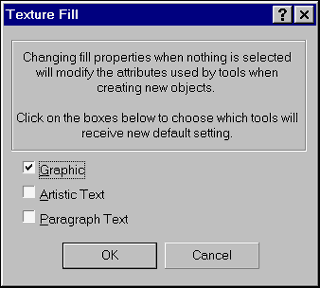
Set Default Fill When you create any object, a default fill is applied. The CorelDraw default is "no fill" but you can set any fill as the default fill. Make sure nothing is selected in your document, or set defaults before you create any objects. Select the fill you want through any method. A pop-up screen will ask you which objects you would like this fill to affect. Choose to have the fill apply to all graphics, artistic or paragraph text. Click OK and the fill you choose will become the default. |
|
|
|
||
|
|
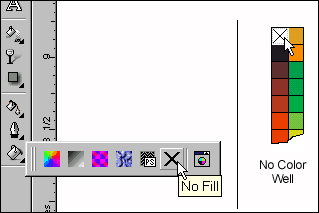
Remove Fill Select object with the Pick Tool. Click on the "No Color" well in the color palette. Or, click on the Fill Tool in the Toolbox and chose the X icon. Both methods will remove the fill for that object. |
|
|
|
CorelDraw 101: All About Fills Tutorial IndexFill Tool Overview |


URL: https://www.webreference.com/corel101/7/
Created: June 11, 2001
Revised: June 11, 2001
 Find a programming school near you