Animation in Tables- Giordan on Graphics | 2


Step 1-
Use Photoshop Layers to Modify the image
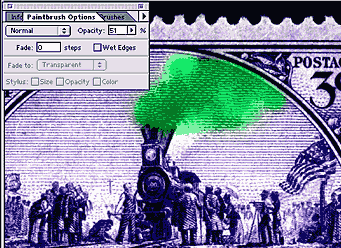
I started with a scan of a postage stamp which I opened in Photoshop. After deciding to make the smoke puff out of the smokestack, I set about trying to isolate the smoke area so that I could make it move.
To do this, open the Layers palette and duplicate the background layer by selecting Duplicate Layer from the pop-up menu in the upper right corner of the palette. In the dialog box that appears, name the new layer layer 2 and click OK to create the new layer.
With the duplicate layer active, select the Quickmask icon to enter Quickmask mode. Now select a paintbrush and paint in a selection around the smoke area to define the selection. The figure at left shows the green mask* of my selection, and that I'm using a transparent paintbrush at 51% opacity. Painting a transparent Quickmask results in a transparent selection, which will help the effect I'm going for in this image. Exit Quickmask to convert the mask to an active selection.
*Note- Your mask color may be different, depending on how you've set up your Quickmask parameters. (See my previous columns on Quickmask for more details).
Produced by Daniel Giordan
All Rights Reserved. Legal Notices.
URL: https://www.webreference.com/graphics/column9/
Created: Mar 5, 1999
Revised: Mar 5, 1999


 Find a programming school near you