Paint Shop Pro Selections pg 4: Production Graphics with Wendy Peck at webreference.com
 |
Paint Shop Pro Selections: Text and Floating Selections | |
|
Text created with the selection tool on a photo.
Text selection in place. Copy at this point to move the photo filled text to a new document.
The copied text applied to a plain white background in a new document. Pasting as a selection maintains the original text selection boundaries. Photo © Tom Thomson Photography. Used with permission. |
We have covered the main selection tools available in PSP, but there is one more lurking, and it can create very popular effects. The Text tool in PSP can also be used to create a selection boundary. The image at the right has a text selection copied from a photograph and applied to a new document. Activate the Text tool in the Toolbox. Type the text you desire in the normal way, choosing a heavy font that will show up with a photographic interior. You may also want to increase the kerning, since the letters often seem to be too close together when working with images. (See Text as Design for more on text manipulation in PSP.) Choose Selection in the Create As section of the Text Entry window and accept. The text is shown as a selection boundary with no fill. If it is not in exactly the right location, simply click on the canvas again with your text too. The selection is canceled each time you reopen the text window. You can save the selection (see next page), fill it with a texture, or, as I have done here, copy the selection. To move to a new document, simply activate or create the document you wish to have the photo text added to, and paste into the new document as a new layer or as a new selection. Pasting as a new selection will hold the selection boundaries in case you wish to do more manipulation, but make sure that you place it on an empty layer. Pasting to a new layer creates a layer, but does not keep the selection boundaries intact. Let your imagination go with this technique. Add shadows or lighting effects for even more impact. Make sure that you do have a substantial font though. It is very unusual to have this effect work on narrow type, or at too small a size. You must be careful that the text remains legible, or you'll lose the main purpose. |
|
|
Top image with regular selection moved. The lower image shows the difference when a floating selection is moved.
|
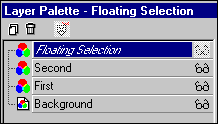
Floating selections A regular selection affects the pixels below. In the top image at the right, I made a circular selection and moved it. See how the pixels in the original location that were contained within the selection are now showing the background color. In the second example, the selection has been "floated." Choose Selections>Float. This time when I moved the selected area, the original object stayed the same. The selection picked up the information from the original to create the circular object to the right, but did not affect the original. A floating selection will appear in the layers palette as a Floating Selection, in italics. To return it to normal, you can choose Selections>Defloat from the main menu, or right click on the layer and choose defloat from the pop-up menu. The Floating Selection layer will disappear, as the selection is now a regular part of the layer. |
|
|
Selecting with channels Let's move on to editing and modifying your selections. |
||
Paint Shop Pro Selections Tutorial IndexPaint Shop Pro Selections: Back to Basics
|


URL: https://www.webreference.com/graphics/
Created: October 12, 2000
Revised: October 12, 2000
 Find a programming school near you