Paint Shop Pro Selections pg 3: Production Graphics with Wendy Peck at webreference.com
 |
Paint Shop Pro Selections: Magic Wand | |||||||
|
Make sure you also see Masks are Easy ... Really. Masks are selections and the two articles work hand in hand.
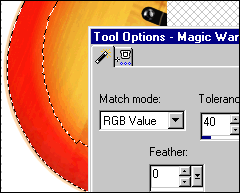
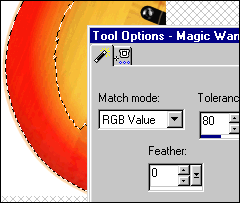
Much more area is selected with the Magic Wand when the tolerance value is raised. |
Of all the selection tools, the Magic Wand probably saves more time than any other. The concept is simple: One click and all similar colors in that area will be selected. Of course, we must not forget that our overall subject here is computer graphics, and nothing is ever that simple. To create a selection with the Magic Wand, activate the Magic Wand tool, and click on a color area. A selection border will appear around the similar color that is connected to the color area you clicked on. The color variation that will be selected is adjustable. With the Magic Wand tool active, open the Tool Options window. The Tolerance setting controls the range of colors that will be selected by the Magic Wand. In the top image, the tolerance is set to 40 and the selection border encloses only the solid red area. In the second image, the tolerance value has been increased to 80, which means that the Magic Wand will select any adjacent color that is within 80 shades of the color you clicked on. Notice how the selection border is now including much of the area where the red and gold mix. Although you could try mathematically figuring the Tolerance range, it is far more practical to use common sense. If you would like more color areas selected, increase the tolerance. If too many colors are selected, reduce the tolerance. In addition to selecting a color range, you also have the power to use a different criteria for selection. Click on the Match Mode drop-down menu, and you will find several different options. Each of the following match modes also use the Tolerance value to adjust selection area.
|
|||||||
|
|
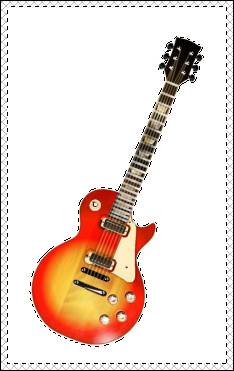
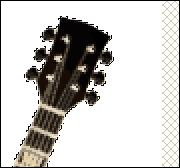
Thinking backwards: Inverting a selection In the case of the guitar shown at the left, selecting the entire guitar would be a challenge. However, it has a one color background. With the Magic Wand tolerance set to 1, one click selects the entire background. Note the selection boundaries around the outside of the canvas. Now, you can invert the selection and have a perfectly selected guitar. Choose Selections>Invert. Notice how the selection in the close-up view to the left is now around only the guitar (no selection boundaries on the edge of the canvas) and how well the details have been selected around the edge. It always pays to think in the opposite direction when using the Magic Wand. I have had cases where I wanted to remove a background, and the fastest way to do it was to select the pixels within the object. I then inverted the selection and had a perfect background selection. Of course, this only works when the opposite area is more consistent for one of the Match Mode settings. If you are new to the Magic Wand, the best advice I can give you is to experiment. If you do not get the results that you are seeking, adjust the tolerance, or the Match Mode. It only takes a minute to check another setting, and the savings are significant over using the Freehand Selection tool to accomplish a selection. Read on to discover a few tricks on capturing those impossible selections and editing selections that are close, but not yet perfect. |
|||||||
|
|
Paint Shop Pro Selections Tutorial IndexPaint Shop Pro Selections: Back to Basics
|
|||||||

URL: https://www.webreference.com/graphics/
Created: October 12, 2000
Revised: October 12, 2000
 Find a programming school near you