Paint Shop Pro Selections pg 5: Production Graphics with Wendy Peck at webreference.com
 |
Paint Shop Pro Selections: Edit Selections | |
|
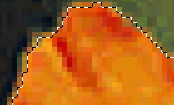
Darker orange areas were left behind with the original Magic Wand selection.
Using the Magic Wand at a low tolerance with the SHIFT key pressed down picks up the darker areas.
Finally, the ragged edge is removed with the Freehand Selection tool with the CTRL key pressed to subtract from the selection. |
If we only had the tools covered in the preceding pages of this article, we would be in serious trouble. In over ten years working with raster selections, I can remember very few perfect, one-click selections. Unfortunately, creating an accurate selection usually involves adding or subtracting from the original selection. Fortunately, that is very easy. In the image at the left, I did a selection with the Magic Wand. Note how the darker areas of the flower were not selected. You can increase the tolerance to include more pixels, but often that starts collecting pixels from beyond the area you require. In order to add the darker colors, I added to my selection with the Magic Wand. To add to a selection, hold the SHIFT key down as you select the next area. Note in the second sample here, that the center is now part of the selection, but a problem area exists at the bottom, where a few pixels have been collected from the stem. In this case we want to subtract from the selection, and that is done by holding the CRTL key down as you make a selection. Here, I have the Freehand Selection tool active and the CTRL key pressed down. Note the - beside the cursor. I carefully traced along the flower edge, but could be quite careless with my selection once I was away from the edge.
There is no limit to the number of additions or subtractions that you can do. It is a good idea to zoom up very close to the area you are working on for accuracy. In fact, even if the initial selection is not good with the Magic Wand, I will often start there, and then zoom in to perfect the selection. It can be difficult to create a selection from scratch when you have the image dramatically magnified, and the initial selection can help you to keep your perspective when working at high magnification. You can use the SHIFT key to add to any type of selection and the CTRL key to subtract from any type of selection. If you have not mastered this skill, it is one that you truly need to reach a competent level with PSP. |
|
|
Selection has been contracted by 1 pixel to remove all antialiasing against the dark background.
Simple copy and paste of the above selection. Notice the hard and unnatural edges.
Here, I selected the white background and expanded the selection by 1. Only the outer 1 pixel of the flower is affected with this selection. I then applied the Soften More effect. Much more natural. |
Adjust an entire selection In the sample at the left, note how contracting the selection by one pixel removed all of the antialiasing. Now I can blur copy this flower and place it on a light background, although I will have to blur the edges to make it look natural. Look for opportunities to use the expand and contract feature in PSP. Often, when looking at a terrible result, one pixel can make a big difference. This is also the way to soften your edges. Select the background of the image (assuming it is plain) and expand the selection by 1 pixel. You now can apply an effect to only the outside 1 pixel of the object. Apply a blur or soften, and the edges start to appear very natural. If your object is easier to select than your background, contract the selection by one pixel, then invert your selection to achieve the same results. Photo © Tom Thomson Photography. Used with permission. |
|
|
The selection for the top green circle has been feathered by 5 pixels before filling.
Close-up of the selection showing the feathered area. |
Feather your selection The image at the left shows one green and two blue circles with no feathering at the edges. The top green circle selection was feathered by 5 pixels before filling. Note how the edge is very soft. To feather your selection, choose Selections>Modify>Feather and specify a value in the Feather Selection window, which pops up when you choose Modify>Feather. When an object seems to be too harsh, feathering the selection is often the answer. You can fill or delete, add effects ... in short, do anything to a feathered selection that you can do to any selection. For creating unified graphics, this is one of the most powerful features in PSP.
|
|
|
|
Select similar pixels To select all the pixels in a document within the range of colors you specify for the Magic Wand tolerance value, simply choose Selections>Modify>Select Similar. Any pixels that fall within the Magic Wand tolerance range on that layer will be selected. In the images at the left, the first example is a Magic Wand selection of the smaller green circle. The second image was selected with the Select Similar command, and would have been effective for any number of similar colored areas. Finally, lets take a look at saving your selections for future use, or to share with another document. |
|
|
|
Paint Shop Pro Selections Tutorial IndexPaint Shop Pro Selections: Back to Basics
|


URL: https://www.webreference.com/graphics/
Created: October 12, 2000
Revised: October 12, 2000
 Find a programming school near you