Paint Shop Pro Selections: Production Graphics with Wendy Peck at webreference.com
 |
Paint Shop Pro Selections: Back to Basics |
|||||
|
Selections form the base for everything we do in Paint Shop Pro. It is important that your toolbox be full of tricks and techniques to get just the right selection.
|
Last time I focused on Photoshop selections. The article was originally intended to be a raster program selection tutorial, but I was not far into the content when I realized that Photoshop and Paint Shop Pro shared little when it came to selections. The only answer was to separate the two. This then, is an entire tutorial devoted totally to Paint Shop Pro selection techniques. You should start by reading the first page of the Photoshop Selections tutorial, though, where I go through the reasons for devoting so much time to a topic that seems so simple. This is the first time I have featured Paint Shop Pro 7 for a tutorial.
Although most techniques will be essentially the same, I will try
to watch for changes with this version and make note for those who
are still working with PSP 6. Watch for this symbol, With all the housekeeping out of the way, lets dive right into learning about selections. |
|||||
|
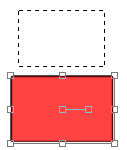
Raster selection shown at the top, and a vector object selection below.
|
Selection Types The image at the left shows a raster selection boundary and then a vector selection boundary. The raster selection will restrict whatever operation you wish to perform to within the selection boundary. The vector selection signifies an object, which is why you see transformation handles instead of the dashed line you see in the raster selection. You can reduce or enlarge this object at will, change the shape, etc. You can also change the color or the stroke, but you cannot apply any of the special effects that are so abundant in PSP. You must convert your vector layer to a raster layer to add the photo effects. Once a vector layer is converted to a raster layer, it is exactly the same as any raster layer. You cannot convert a raster layer to a vector layer. We will talk mostly about raster selections in this tutorial, since the vector selection can be wrapped up fairly simply. Select the Vector Selection tool and click on the object. Period! That's all there is. Except ... well, there is Node Edit, that we will touch on a little later. To compare to raster selections, however, it really is a select the tool and click operation. So ... having disposed of the vector selection topic for a while, let's take a look at how the raster selection tools operate. |
|||||
|
|
Paint Shop Pro Selections Tutorial IndexPaint Shop Pro Selections: Back to Basics |
URL: https://www.webreference.com/graphics/
Created: October 12, 2000
Revised: October 12, 2000


 Find a programming school near you