Rough it Up pg 3: Production Graphics with Wendy Peck at webreference.com
 |
Rough it Up 3: Rough Edges in PhotoShop | |
|
Bas Relief filter: Detail 2;
Smoothness 6; Light Direction Bottom; Foreground black; Background white.
Filled with self defined pattern created with a black rectangle and a heavy canvas pattern with black foreground and white background. |
Once you have your outline selected you can apply any filter or fill to only that area. You will want to turn your selection borders off in order to see the results. CTRL H toggles the "marching ants" border on and off, but leaves the selection intact. I have included two samples here, one with a filter and one with a fill, but this is just a start. You are limited only by your imagination. I have included more samples on another page. Although these samples use just the text and the background color, there is no reason you have to restrict yourself. This selection creates an outline and can be filled with a color pattern. Many of the filters included with PhotoShop use the background and/or foreground color to accomplish the look. Experiment! Create Actions |
|
|
|
Rough Lines |
|
|
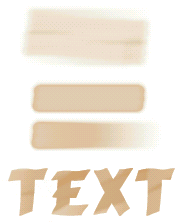
All samples in this image were done with the brush we created above. Top: Airbrush tool Pressure 19%; Fade 30; Fade to Transparent. Second: Brush tool Opacity 84%; Fade 0; Wet Edges On. Third: Brush tool Opacity 84%; Fade 30; Wet Edges On. Bottom: Text entered with Text As Selection tool; Airbrush tool as above; filled with 30% foreground color after airbrushing to define character shape. |
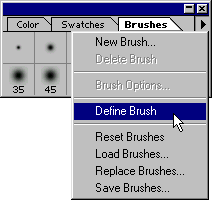
You can use rough lines to divide your pages, or even as design elements. Experiment with the brushes included with PhotoShop, or search the Web for brushes. You can also create your own very easily. Choose Window>Show Brushes from the Main Menu to open the Brushes window. Click on the menu fly-out at the top right of the window and choose Define Brush. That's it. Your new brush will appear in the Brushes listing (you will probably have to scroll down to see it).
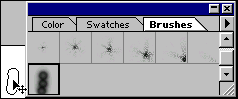
Select the area you wish to have included for the brush. This is an elliptical selection with transform selection used for fine tuning the selection. Note that I have left some of the feathering outside the selection area. I did not want any pure white areas in my brush.
The sample at the left shows several variations using the brush we created. To delete a brush, simply select it in the Brushes window and choose Delete from the fly-out menu (or right click on the brush). Try your hand at creating the perfect brush for your project. It may take a little time, but you will have total design freedom to achieve the look you desire. As with Actions, custom brushes provide consistent results even when months pass between uses. |
|
|
|
Rough it Up Tutorial IndexRough it Up Start
|


 I created
one shown here with three clicks of the 13 pixel feathered brush from
the PhotoShop 5.5 default brushes (magnified to 400% here). For most
brushes you will want to use black as the foreground color. If you wish
to have strong color or well-defined shapes, use the Pencil tool or
a non- feathering brush to create your new brush.
I created
one shown here with three clicks of the 13 pixel feathered brush from
the PhotoShop 5.5 default brushes (magnified to 400% here). For most
brushes you will want to use black as the foreground color. If you wish
to have strong color or well-defined shapes, use the Pencil tool or
a non- feathering brush to create your new brush. 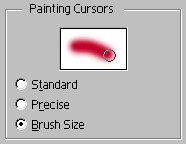 Your
brush now appears in the Brushes window. Choose the Brush from the Toolbox.
Note: You can have your cursor reflect the size and shape of
the selected brush by choosing File>Preferences>Display and Cursors
window from the Main Menu. Choose Brush Size from the Painting Cursors
section. See the illustration at the left which shows the new brush
as selected and the cursor reflecting the size and shape of the brush
we just created.
Your
brush now appears in the Brushes window. Choose the Brush from the Toolbox.
Note: You can have your cursor reflect the size and shape of
the selected brush by choosing File>Preferences>Display and Cursors
window from the Main Menu. Choose Brush Size from the Painting Cursors
section. See the illustration at the left which shows the new brush
as selected and the cursor reflecting the size and shape of the brush
we just created.
URL: https://www.webreference.com/graphics/
Created: Mar. 1, 2000
Revised: Mar. 3, 2000
 Find a programming school near you