Photoshop Lighting Effects - Giordan on Graphics
![]()
![]()
![]()
![]()
![]()

 Adding a Texture
Channel
Adding a Texture
Channel 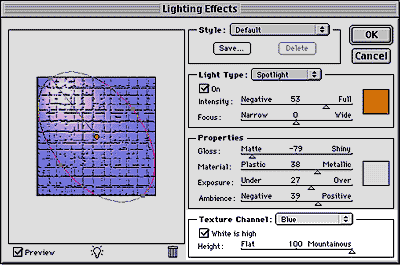 |
At the bottom of the Lighting Effects dialog box is a section called Texture Channel. These settings allow you to add 3D relief to the filter effect. The application is based off the grayscale values of a specific channel, where white or black becomes the highest relief area. The first control in this area is the pop-up menu that lets you choose the channel for the effect to be based on. Select Red, Green, or Blue (in an RGB image), or None to avoid applying any texture effect to the image. Remember that the Lighting Effects filter can only be applied to an RGB image, so these are the only choices you'll see in this area. All other image types will be unable to access the Lighting Effects filter. |
|
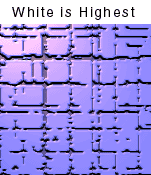 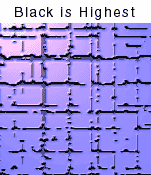 |
Once you've set the source channel, move the Height slider up or down to vary the amount of the relief. Click the "White is High" box to set white as the high relief spot. Leave it unchecked to have black be the highest area. |
![]()
Produced by Daniel Giordan
All Rights Reserved. Legal Notices.
URL: https://www.webreference.com/graphics/column 15/
Created: June 1, 1999
Revised: June 1, 1999
 Find a programming school near you