Photoshop Lighting Effects- Giordan on Graphics | 2
 Applying the Basic
Filter

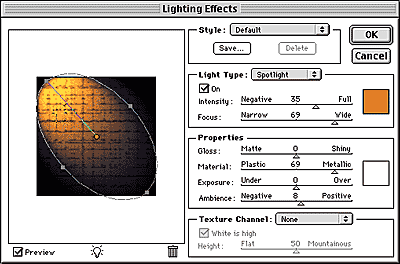
The Lighting Effects filter can be used with just a few mouseclicks, or you can spend half an hour tweaking the controls to get the effect just right. The basic approach to the filter is as follows:
- Begin by selecting Filter>Render>Lighting Effects. This will launch
the Lighting Effects dialog box as shown on the left.
- By default, a single spotlight effect is cast onto a thumbnail of your
image, on the left side of the dialog. You can see that the spotlight effect
is defined by an oval, and that it has a center point and handles on the
side. Click and drag the center point to move the light into position relative
to your image.
- To change the intensity and spread of the light, drag the handles to
widen or narrow the effect.
- To set the color for the light, click on the color swatch in the Light
Type section in the upper right area of the dialog. The default is white,
but clicking the swatch brings up the standard color picker dialog, allowing
you to select any color you wish.
- Complete the basic effect by clicking OK.
Produced by Daniel Giordan
All Rights Reserved. Legal Notices.
URL: https://www.webreference.com/graphics/column 15/
Created: June 1, 1999
Revised: June 1, 1999


 Find a programming school near you