3D Studio MAX 3: In Depth. Sample Chapter | 9
|
|
Rearranging the Stack
Even with better resolution, the shape is a little confusing. The Twist modifier acts on the input it receives from below, and with the box already bent, the twist around any straight axis is very different from a twist applied along the original axes of the box. The box would probably look a lot better if you twisted it when it was still straight and then bent it.
In MAX, there's no need to undo or start over again. Just move the Twist modifier down the stack so that it precedes (rather than follows) the Bend modifier. Follow these steps:
- Click on the Edit Stack button on the Modify panel to bring up the Edit Modifier Stack dialog box. Use the cut and paste buttons to cut the Twist modifier and paste it beneath the Bend modifier. Your stack should now look like the one in Figure 1.12. Click on the OK button to confirm the change.
- Now, you can make all kind of adjustments at every level of the stack to create what you want. Go down to the parametric Box at the bottom of the stack to make it taller by increasing the Height parameter. To see the effect at only this point in the modifier stack, click on the little tube icon to the right of the bulb icon (which toggles the evaluation of the stack--it's called the Show End Result toggle). If the tube is full (white from top to bottom), the screen displays the result of the entire stack, regardless of the level at which you're currently editing. If the tube is half-full, the screen displays only to the current level of the modifier stack. With the button set to the half-full stage, you see only the box before the application of the Twist and Bend modifiers. Take a look at Figure 1.13.
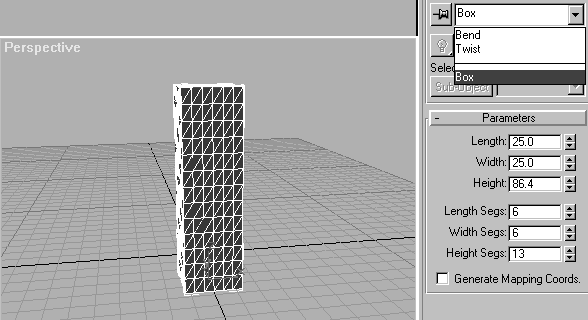
Figure 1.13 The box height parameters are increased. The screen displays the state of the primitive object before the application of the modifiers.
- Move up to the Twist level in the modifier stack and make sure that the Show End Result button is toggled to the half-full stage. Thus, you see only the effect of the Twist modifier before the application of the bend. Change the twist-angle value from -180 to +360 to get twice as much twist, and in the opposite direction. But notice something peculiar: The Twist gizmo doesn't completely enclose the object as it's been doing up until now. Look at the object in a front wireframe view (rather than a shaded perspective view) to see this more clearly. Your screen should look like Figure 1.14.
- The Twist gizmo has retained the size it was before you moved it down the stack. To make it the correct size, click on the Sub-Object button in the Modify panel, which turns yellow. Now, you can operate directly on the gizmo. Click on the Scale button on the MAX Main Toolbar, and then hold that button down to reveal three options. The middle of the three buttons is for non-uniform scaling, which means that you can resize independently in each of the three dimensions. Select the non-uniform scaling option.
- Now, get set up to perform the scaling. Make sure that you are in the local coordinate system, using the drop-down box in the center of the Main Toolbar (the default is View). Once in the local coordinate system for the selected gizmo, notice how the vertical dimension is z. Set your constraints to the z-axis by clicking that button in the Main Toolbar. Go down to the gizmo in the window and drag the cursor to scale it vertically. Watch how the effect of the modifier on the object changes as the gizmo is scaled. When you've scaled it to fit the object, your screen should look like Figure 1.15.
- Finally, move up to the Bend modifier and play with the bend angle until you have something that you like. You have a twisted object that's bent, and because MAX permits you to animate modifier values, you could create a clip in which the twisted box object bends back and forth. You may want to go back down to the bottom of the stack and adjust the segmentation of the parametric object to get a pleasing smoothness of the final model. Take a look at Figure 1.16.
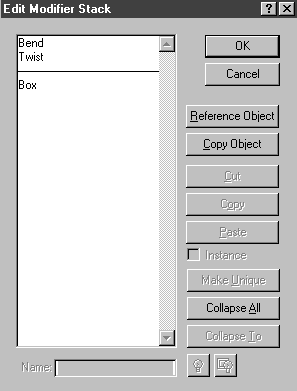
Figure 1.12 The Edit Modifier Stack dialog box after the Twist modifier has been moved beneath the Bend modifier.
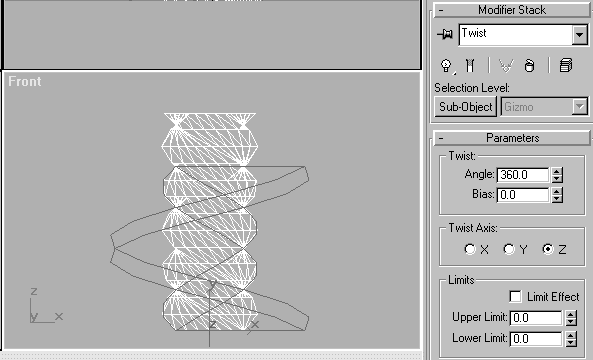
Figure 1.14 Front wireframe view, showing the effect of Twist modifier with new settings. The Twist gizmo is shorter than the object.
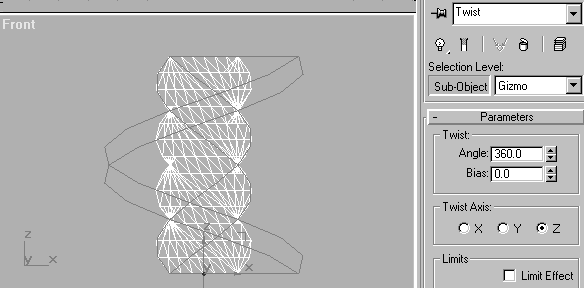
Figure 1.15 Using the Sub-Object mode, the gizmo is scaled in the local z-dimension to fit the object.
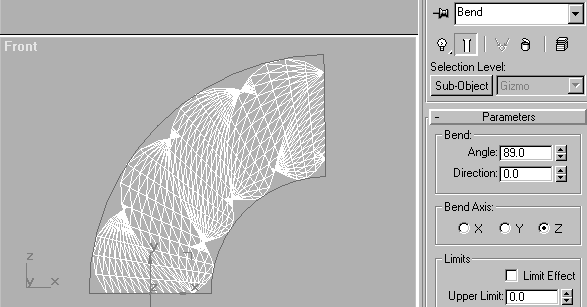
Figure 1.16 The twisted object's bend angle is adjusted in the Bend modifier. The segmentation has also been increased at the bottom of the stack for greater smoothness.
If you've made it all the way through these exercises, you should have a basic grasp of the modifier stack concept. The modifier stack is a process. You can add steps to the process, delete them, change their operation at any time, and even change the order of the steps. Each step in the process feeds the next step, and the final result is the output of the last step.
The Transforms And The Modifier Stack
In all of computer graphics, the three operations of moving (translating), rotating, and scaling objects are known as the transforms. You'll get deeply into the transforms in Chapter 3 and elsewhere, but for right now its important to understand how the transforms relate to the modifier stack.
In general, it makes sense to translate, rotate, or scale a finished model. Thus, in MAX, the transforms are applied after the evaluation of the modifier stack. Seen as a process, an object is output from the end of the modifier stack, and then the transforms are applied. This simple fact has many important consequences. For example, as explained in Chapter 3, the nonuniform scaling of an object with modifiers can have a completely different result from the resizing of the parametric object at the bottom of the stack. As you saw in the exercise with the Twist and Bend modifiers, it matters a great deal where in the process an operation is applied. Rescaling applies at the level of the finished object, whereas resizing the creation parameters operates at the beginning. If you rescale and then change your modifier stack in any way, the scaling may no longer make sense.
| To Continue, Use Arrow Buttons |
|
Comments are welcome
Reproduced with permission from The Coriolis Group, copyright © 1999
Created: Sept. 30, 1999
Revised: Sept. 30, 1999
URL: https://webreference.com/3d/books/max3/1-5-3.html


 Find a programming school near you