3D Studio MAX 3: In Depth. Sample Chapter | 8
|
|
Adding a Second Modifier
Continue building your modifier stack by adding a Twist modifier on top of the Bend modifier. Follow these steps:
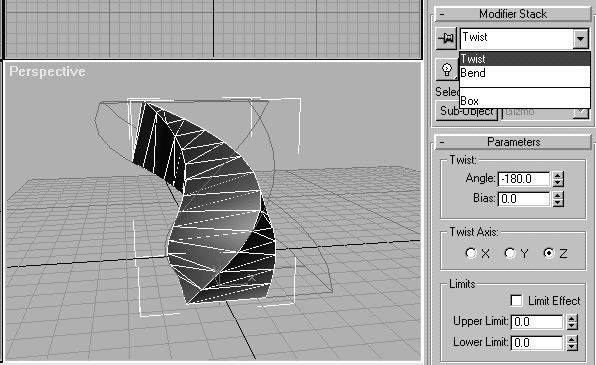
- Click on the Twist button when you are currently on the Bend modifier in the Modify panel. A Twist gizmo appears around the bent box. Set the twist angle to -180 degrees in the default z-axis. Your result should look like Figure 1.10.
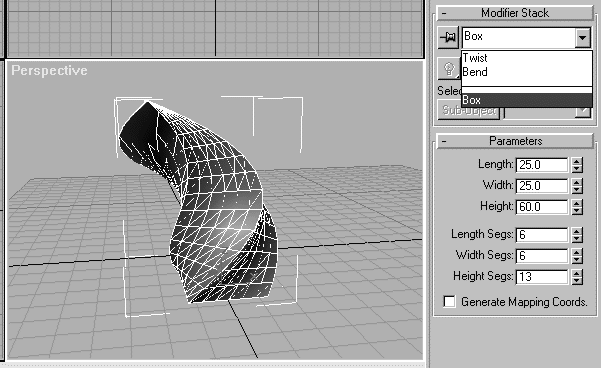
- A couple of things are wrong with this, and fixing them will help you further understand the operation of the modifier stack. First, the object is (once again) not displaying smooth curvature. You increased the segmentation in one direction to correct the bend, but the twist requires increased segmentation in all three dimensions. So go back to the parametric object at the bottom of the stack and increase the segmentation parameters until the geometry is dense enough to hold the curvature. Don't go overboard--you want geometry that is heavy (dense) enough for your purposes without creating more polygons than you need. Your object should now look like the one shown in Figure 1.11. You'll notice a subtle difference between Figures 1.10 and 1.11, especially when the object is rendered.

Figure 1.10 Twist modifier is applied on top of the stack for Figure 1.9, and the twist angle is set to -180 degrees in the z-axis. The bend box is twisted around the vertical axis.

Figure 1.11 Back to the bottom of the stack to increase the segmentation in the width and length dimensions. The object's geometry is now dense enough to hold the twist.
| To Continue, Use Arrow Buttons |
|
Comments are welcome
Reproduced with permission from The Coriolis Group, copyright © 1999
Created: Sept. 30, 1999
Revised: Sept. 30, 1999
URL: https://webreference.com/3d/books/max3/1-5-2.html


 Find a programming school near you