3D Dingbats by Shirley Kaiser pg 6: Production Graphics with Wendy Peck at webreference.com
 |
3D Dingbats: More Gradient Effects | ||||||||||
|
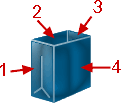
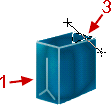
To the left you'll see two shopping bag samples. On the far left is the blue shopping bag with Photoshop 6 new Satin Layer Style. Next to it is a sample with a subtle gradient fill added to two sections of the shopping bag to help create a further dimensional quality. |
||||||||||
 |
In order to achieve the right effect with the light source, two panels of the shopping bag will need to have the gradient applied separately (panels 1 and 3 to the left), since the light impacts each panel in a slightly different way. The shopping bag dingbat font layer will need to be rasterized in order to proceed with handling each panel separately. If you haven't yet made a duplicate copy of this layer and hiding it, I'd suggest doing so now to keep your font information for this work. (If you don't already do this, I also strongly recommend saving your work often to lessen the risk of losing your work.) 8. To rasterize the type, from the drop-down menu, click on Layer>Rasterize>Type. |
||||||||||
|
9. Using the magic wand tool, select the first panel to which to apply the gradient. The following tool adjustments will show you how to achieve similar results as the sample shown. Feel free to experiment and play, as I note in the Tip below. 10. For your gradient this time, use the eyedropper tool to select one of the lighter shades from the color layer for the foreground color. 11. Click on the Gradient Tool in the Toolbar. In the Gradient
Toolbar you'll see your new lighter shade for the gradient color. Also
in the Gradient Toolbar, |
||||||||||
|
12. Using the same procedure as the previous gradients, apply the gradient tool to panels 1 and 3, allowing for lighter and darker shades similar to the finished sample above. The lighter shades should be toward the top left of panels 1 and 3, with darker shades away from the light. Tip: I also encourage you to experiment with dragging the gradient tool across your selection in various directions. You'll notice in the sample that I began fairly high above the selection but stopped just below the selection. Try varying that length and direction and see what happens to your results. Try varying the Mode and Opacity settings. There can be an enormous variety of results. The more you play, explore, and experiment, the more you'll see the tremendous potential with this powerful tool. |
||||||||||
  |
13. Once you have applied the gradient fill to panels 1 and 3, save your image file. The final and optional step will be to add a perspective shadow with Alien Skin Eye Candy 3.1. |
||||||||||
|
|
3D Dingbats Tutorial Index3D Dingbats: Bringing a Dingbat to Life |
||||||||||
URL: https://www.webreference.com/graphics/guest/3d_dingbats/
Created: November 10, 2000
Revised: November 10, 2000


 Find a programming school near you