CorelDraw 101: Basic Toolbox pg 8: Production Graphics with Wendy Peck at webreference.com
 |
CorelDraw 101: Basic ToolboxSpiral Tool Overview | |
|
|
Choose Spiral Tool Choose the Spiral Tool from the Toolbox. Note the position in the Toolbox. The Polygon or Graph Paper Tool may be showing, and you will have to click on the triangle in the bottom right corner to open the fly-out. Choose Spiral Tool. |
|
|
|
||
|
|
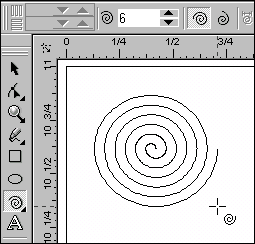
Draw a Symmetrical Spiral Choose Spiral Tool. Choose number of revolutions for your spiral from the Property bar above the workspace. Click on the Symmetrical icon. (A symmetrical spiral has equal distance between spiral revolutions.) Click and drag on the workspace to create spiral of desired size. Hold your CTRL key down as you drag to create a spiral with a circular shape. Hold your SHIFT key down to have the spiral drawn from the center. |
|
|
|
||
|
|
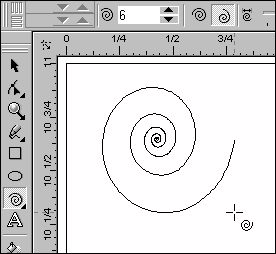
Draw a Logarithmic Spiral Choose Spiral Tool. Choose number of revolutions for your spiral from the Property Bar. Click on the Logarithmic icon. (A logarithmic spiral increases the spacing on each revolution.) Choose the Spiral Extension Factor from the Property Bar. A lower number reduces space difference between revolutions. Click and drag on the workspace to create spiral of desired size. Hold your CTRL key down as you drag to create a spiral with a circular shape. Hold your SHIFT key down to draw spiral from the center. |
|
|
|
||
|
|
Spiral Properties Right click on the Spiral Tool to open the Spiral Options window. Although the Option window does not provide any features that are not available in the Property Bar, there is a preview of the resulting spiral which could save time. Also, setting properties in the Option box creates a default style, which could save time if you have many spirals of one type to create. |
|
|
|
CorelDraw 101: Basic Toolbox Tutorial IndexObject Overview |
URL: https://www.webreference.com/corel101/4/
Created: January 26, 2001
Revised: January 26, 2001


 Find a programming school near you