Into the Shadows pg 4: Production Graphics with Wendy Peck at webreference.com
 |
Into the Shadows: Paint Shop Pro Shadow Basics | |
|
|
Paint Shop Pro has built a reputation in the professional graphics world for its easy to learn interface and powerful capabilities. PSP also provides an almost boundless supply of editable effects that you can apply to your image, or sections of you image. The Drop Shadow command falls into the effects category. I am using Paint Shop Pro 7 for this article. I will make note of differences in technique between PSP 6 and 7 for a while yet, to give everyone a chance to upgrade, so don't worry if you have not made the leap. There is little difference in the Drop Shadow command between the two versions, which should help keep any confusion down. |
|
|
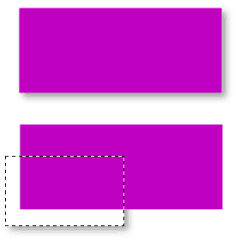
You can apply a shadow to a layer, as in the top sample, or to a selection as shown in the lower image.
Two drop shadows with nothing but opacity blur changed. The lower sample is much easier to read.
Proof (eye) and Auto Proof (next to the eye) are new features in the PSP 7 Drop Shadow window. |
PSP can create shadows in two different ways. You can apply the shadow to an entire layer, or you can select an area, and apply the shadow to just the selection. It is important to note that the selection will override the layer method. In other words, if you have a selected area, the drop shadow will automatically be applied to that selection. To use the layer shadow, you must be sure there is no active selection. Drop shadows must be applied to raster layers. If you are working with a vector object, you will have to convert the layer to raster in order to apply any effect, including drop shadows. No matter how you make your selection, though, the same principles apply. The first thing, in my opinion, is to understand that a shadow can do damage to your image. They must be carefully planned and adjusted to achieve a great look. Many people use only default values to apply drop shadows. This is a serious mistake, since the default values are almost never a good choice for any object. Almost all programs offer defaults that are too dark, or two defined. Look at the sample at the left to see how much you can improve the look of a shadow by changing a few values. The absolute basics To create a shadow to an entire layer, make sure there is no selection and that the layer you wish to add the shadow to is active. PSP 7: Select Effects>3D Effects>Drop Shadow. The Drop Shadow window will open. Adjust the Opacity to make the shadow lighter or darker, and the Blur to make the edges softer or more distinct. The horizontal and vertical offset affect how close the shadow will be to the object. You can also change the color of your shadow not all shadows are gray. See the sample at the left with a brown-toned shadow. PSP 7 Note: The Drop Shadow window now offers a Proof and Auto Proof function. Make sure that you can see your canvas when you are applying a drop shadow. Press on the eye icon (Proof) and the Auto Proof icon to the immediate left and you will be able to see any changes you make to the drop shadow on your document as well as in the preview. |
|
|
|
Apply a drop shadow to a selection The second image was created with a background pattern. The top graphic is a dingbat font applied as a selection, and a drop shadow effect applied. The text below was also created as a selection, filled with black, with a drop shadow added to the text selection. Quick, easy and versatile. Pause for a few moments to think of where you could apply selection shadows to add dimension to your work. |
|
|
An perfect example of a poorly applied shadow. Your eye must really focus in order to make out the words. When it is brought to your attention like this, you may think this is an exaggerated example. However, keep your eyes open. This is a default setting in many graphics programs ... you will not travel far before you find samples like this. |
My plea to you And when you are applying a shadow to text, please, please, make sure you are not interfering with the legibility of your text. This is a personal pet peeve. When I have to concentrate hard on a menu item or headline because a carelessly applied shadow prevents my eye from making out the words in a natural way, I find it really annoying and has led me to leave a site. A visitor should never have to work hard to read your message. Now that we have covered the basics of drop shadows, let's move on to how you can enhance your shadows for dramatic effect, or more lifelike appearance. |
|
Into the Shadows Tutorial IndexInto the Shadows: Isn't a Shadow a Shadow?
|


URL: https://www.webreference.com/graphics/column38/
Created: October 26, 2000
Revised: October 26, 2000
 Find a programming school near you