Into the Shadows pg 3: Production Graphics with Wendy Peck at webreference.com
 |
Into the Shadows: Photoshop Shadow Tricks | |
 |
Here is a twist of the white-on-white shadowed sample. I wanted to make sure you knew that you could use shadows to enhance an area with any color or texture. The secret is to keep the background on the area that will be shadowed, exactly the same as the background for the page. In the sample shown here, the background and the selected rectangle have been filled with a taupe color, with the same texture applied to both. It is hard to beat this effect if you are looking for an ultra subtle way to divide page areas or menu items. You do not need to have as distinctive a shadow as I have used here ... keep it really subtle and watch even a monochrome page come to life. To see exactly how this is done, see the sample below. I have returned the backgrounds to white and selected the rectangle that is creating the shadow. This effects takes two layers. One with the background, and the other with a filled rectangle. It is this layer that receives the shadow treatment.
|
|
|
|
Separating the shadow from the layer But how can this happen? When you adjust the shadow, the whole shadow adjusts. Not if it is a separate layer as this one is. I took the layer with its effects and simply separated it from the layer. Once that is done I can do anything I want with the shadow, including transforming, distorting, or as I have done here, painting some of it away. To create this effect, you will add the effects that will form the base for your shadow as you would for any other shadow. Once you are satisfied with the base shadow, and with the layer active, right-click (PC) or Command-Click (Mac) the on the effects icon in the layer. Choose Create Layer from the pop-up menu. PS 6 Note:, You can also select Layer>Layer Style>Create Layer from the main menu. PS 6 Note 2: Make sure that you uncheck the Layer Knocks out Drop Shadow option in the Layer Style window, PS 5.5 Note:, You can also select Layer>Effects>Create Layer from the main menu. You will see a new layer has been created and placed directly under the layer where you placed the shadow. See the Layers palette for the image above, shown at the left. Now that your shadow is on a separate layer, you can manipulate it as you would any other layer. To add the dimension to the shadow above, I used a very large paintbrush (for gentle color adjustments) with a low opacity to shape the shadow. This one fades to nothing at the top and left corners, and has been softened gradually along the whole shadow to blend. Once you have the technique mastered, you can use it for more design elements. We took the idea from the menu and created a matching dividing line, like the one below, which works well as a page divider. You can also gang the lines together and use them to form a menu.
|
|
|
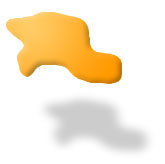
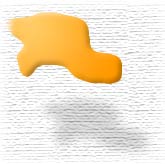
Irregular shapes are no problem when the shadow is created automatically and then separated. The bottom version of this image has had the same texture added to the shadow as was added to the background. A shot of the textured shadow without the background is shown below.
|
Manipulating the shadow layer I've included an irregular shape at the left. When the shadow command is doing all the work, it does not matter how complicated the shape of the shadowed object is. In this case, I also made the shadow smaller and distorted it slightly. The second sample shown here has texture applied to the shadow. Although this shadow is quite translucent, that little bit of solid color was enough to flatten the texture on the background. You could see the texture, but it was not lifelike. I applied the same texture to the shadow that I used for the background, which added a few tiny color shifts to bring the shadow to life. I get more excited about gaining control over a function than I do about a one-click solution to an effect. The day that I first clicked on Create Layer to see what would happen, I could not believe my eyes. Since that long ago day, I rarely keep my shadows attached to the layer. I usually add a little extra blur, or reduce the size a tiny bit to remove the shadow from an edge where the blur has let it escape where I do not want it to be. I also like the ability to move the shadow around with my mouse or arrow keys. The new Layer Style window is large and gets in my way. It is not only how the shadow looks with the object that counts it must look good with the rest of the page as well. Let me drop one final idea for shadows. Gradient fills can be used to enhance shadow layers and make very realistic graphics, especially if you are representing an item seen from a side view. Take these technique and devote some time to experimenting with them. While you are doing that, keep this in mind you can separate all PS layer effects, just like we have done for the drop shadows. Doesn't that does not get your mind racing? |
|
|
|
Into the Shadows Tutorial IndexInto the Shadows: Isn't a Shadow a Shadow?
|


URL: https://www.webreference.com/graphics/column38/
Created: October 26, 2000
Revised: October 26, 2000
 Find a programming school near you