Photoshop Selections pg 5: Production Graphics with Wendy Peck at webreference.com
 |
Photoshop Selections: Edit Selections | |
|
Once you have created your basic selection with the most appropriate tool, you still have many options to fine-tune or add special effects to the area. If you are selecting an uneven area that cannot be picked up with the Magic Wand, you will probably find that there is an area or two of your selection that is not quite right. That is easily repaired by adding to or subtracting from your selection. |
||
|
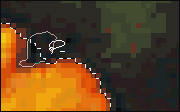
SHIFT key in action with the Lasso tool, adding a new area to the selection. Note the + beside the cursor.
The Lasso tool with the ALT or Option key, removing an area from the selection. See the symbol beside the cursor.
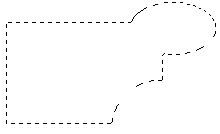
Rectangular selection with circular areas added and removed. |
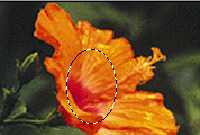
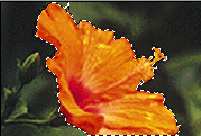
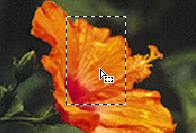
Add or subtract from a selection In the image at the left, you can see that the selection border around this flower has an area that must be added to the selection. It is usually best to increase magnification until you have a very clear view of the edge. Using the Lasso tool, with the SHIFT key depressed (note the + beside the cursor), I traced carefully along the edge of the flower. You can see, though, that once I had the flower edge completed, I did not require accuracy. The area I am tracing on the interior of the flower is already selected, so I have no need to spend time following the edge. The second image at the left shows an area removed by using the Lasso tool with the ALT key. Again, once I have traced the edge of the object, I do not need accuracy for the remaining selection, since that area is already a non-selected area, and removing from it will make no difference. In this case, the flower was the selected area. If the background area was the selected area, you would use the opposite tool to accomplish the same effect. Of course, you can also use the addition and subtraction to selections to draw objects. To create the selection shown at the left, I drew a rectangle, and removed the lower right corner by drawing an ellipse selection with the ALT key pressed down, to remove the area. Finally, with the SHIFT key down, I drew another selection with the Elliptical Marquee tool at the top right corner. There is no limit to the number of additions or subtractions you can use to create a selection. However, if you are working on a complex selection, you may wish to save the selection occasionally as you work along (see below). Of course, you can always use the History palette to step back if you lose the selection through a couple of careless mouse clicks. (Does that sound like experience talking?) You can also use addition and subtraction with any combination of selection tools. Do the original selection with the Magic Wand, and clean it up with any other tool. Start with a Lasso tool selection and add or subtract a range of color with the Magic Wand. I find it much faster to do a rough selection and then add or subtract areas, often at high magnification. TIP: Have you ever started a selection and then realized that you were too far to the left? Yes, you can move it later, but you need to know now where to stop the selection. Try this. When you are drawing a selection, press down your spacebar. You can now move the selection as you desire, and then resume drawing the selection as soon as you release the spacebar. Try it a few times until you have it planted in your mind. I do not use this a lot, but when I do, it is a great time saver. |
|
|
Oval selection in the top image. Bottom image shows the same selection with the Grow command applied. Photo © Tom Thomson Photography. Used with permission. |
Select similar pixels To select similar color areas anywhere in the document, choose Select>Similar. Again, the Tolerance, or range of color selected is determined by the Magic Wand Tolerance value. In the image below, I used the Magic Wand to select one yellow rectangle. The Select>Similar command automatically selected the remaining rectangles.
|
|
|
|
Move your selection I love Photoshop's ability to move the selection not the image contained in the selection, but the selection itself. As long as a selection tool is active, when you move your mouse over a selection, the cursor will change (see left) and you may move the selection at will. However, this only works when selection tool is active. If the Move tool is active, the area of the image that is selected will be moved. |
|
|
|
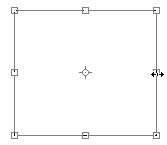
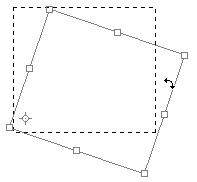
Transform your selection Selection handles will appear around your selection. Use the corner handles, plus your SHIFT key to resize the selection proportionately, or side and top handles to adjust width or height. Position your cursor over a handle and it will change to a double arrow, indicating that you can resize the selection in that direction. Place your cursor on the selection between handles, and the cursor will change to a curved double arrow. At this point you can click and drag to rotate your selection. You can move the rotation axis my moving the icon that is located in the middle of the selection (see the top image for the default location). Simply click and drag the icon to move the rotation axis to the required location. Your selection will now rotate around this point as shown in the sample to the left.
|
|
|
|
Photoshop Selections Tutorial IndexPhotoshop Selections: Back to Basics
|


URL: https://www.webreference.com/graphics/
Created: September 28, 2000
Revised: September 28, 2000
 Find a programming school near you