Photoshop Selections pg 2: Production Graphics with Wendy Peck at webreference.com
 |
Photoshop Selections: Selection Tools | |
|
Four marquee tools in Photoshop. Selection shown above. The toolbar fly-out for the marquee tools is shown below.
Left to right: Rectangular, Elliptical, Single Row, Single Column. The Crop Tool is at the far right, but does not apply to this subject.
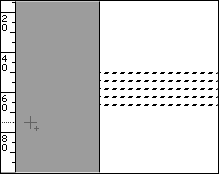
Stripes created with the Single Row and Column Marquee tool. You can create the selection even when the cursor is off the canvas. Make sure you also see Masks are Easy ... Really. Masks are selections and the two articles work hand in hand. |
When I present basic techniques, I will always start right at the beginning. Photoshop offers several selection tools. The selections shown at the left are created with the four marquee tools located in the top left corner of the toolbox. Rectangle, Elliptical, Single Column and Single Row. To make a rectangular or circular selection, click and drag with the desired marquee shape tool. The selection is created from the click point to where you release the mouse. You can also have the selection drawn from the center by holding your ALT or Option key while you click and drag. To select a perfect circle or square, hold your SHIFT key as you make your selection. The Single Column and Single Row Marquee are not as well known, but they can also be very handy. Each will select a one pixel area horizontally or vertically, across the document. A series of lines as shown to the left is surprisingly fast to accomplish. Activate the Single Row Marquee tool, and click to place your first line. Hold your SHIFT key down and line your cursor up on the ruler at the point for the next line and click. You don't have to have your cursor on the canvas to create this selection, which helps to create even stripes. You can work with your cursor against the ruler. In the sample shown here, the cursor is located right next to the ruler, completely off the canvas, yet a click will place a selection. Note the + on the cursor indicating that the SHIFT key is depressed and the selection will be added to the existing selection. Multiple stripes are created instantly with a simple fill.
|
|
|
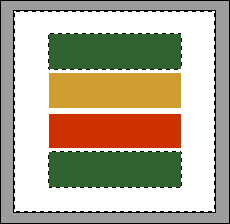
The Magic Wand selects only the color on the active layer with default settings.
The two green rectangles are now on the same layer, and with Contiguous unchecked, one click will select both green areas.
Setting Tolerance to 1 and selecting the background is a quick and accurate way to select objects. Simply invert the selection and you have the exact area you desire. |
Magic Wand However, the real world does not work like that. Photos come with similar colors next to each other or scattered everywhere, not just where you would like to select. There are some workarounds, though, that I will present later in this article, but let's start with the basics for how the Magic Wand tool works. The Magic Wand selects similar color on the same layer. Note in the image to the left, that the Green 1 layer is selected in the Layers palette. Note also that the Magic Wand did not select the green rectangle, located at the top of the rectangles on the screen, and labeled Green 2 in the Layers palette, since that layer is not active.
Or, suppose you have both green rectangles on one layer, as shown at the left. As long as the Contiguous option is unchecked, both green rectangles on the same layer will be selected. With Contiguous checked, only color that is contiguous, or physically joined, will be selected. The Tolerance setting determines how large a range of color the Magic Wand will select. If the Magic Wand is picking up too much of the area you desire, try reducing the Tolerance, or increase it to include more colors. One of my favorite selection tricks, is to use the Magic Wand to select the opposite to what I require. Let's use our green rectangles as an example. I can set the Tolerance to 1, which means just one color will be selected, and click on the white background. This gives me a completely clean selection that is the exact inverse to the selection I desire, as shown to the left. Choose Select>Inverse from the main menu, and you have the selection you desire. This is not so important when you are working with plain rectangles as we are here, but for objects with texture or a photographic image, and an uneven shape, the invert trick will save many hours and give you exact control. Finally, the Anti-aliased option is self explanatory. If I am working with photographic type images, I will work with this turned on. For more solid color work, it is usually better to leave it off. However, as a caution: If you find that you cannot get a single color selection, no matter how low you set the tolerance, check to see if your anti-aliasing option is turned on. Most often this is the culprit when you cannot get a clean selection that should be simple. |
|
Photoshop Selections Tutorial IndexPhotoshop Selections: Back to Basics
|


 Although
the selection goes from border to border, as shown to the right, you
can use the Preserve Transparency option on your layer to create stripes
just on your object. The same image, shown below with a fill applied
to selected areas, illustrates the effect when the Preserve Transparency
option is active for the layer containing the gray rectangle. If you
prefer to have your stripes on a separate layer, preserve transparency
will not work. See Adding or Subtracting from your selection to remove
areas of the stripe pattern that you do not want.
Although
the selection goes from border to border, as shown to the right, you
can use the Preserve Transparency option on your layer to create stripes
just on your object. The same image, shown below with a fill applied
to selected areas, illustrates the effect when the Preserve Transparency
option is active for the layer containing the gray rectangle. If you
prefer to have your stripes on a separate layer, preserve transparency
will not work. See Adding or Subtracting from your selection to remove
areas of the stripe pattern that you do not want.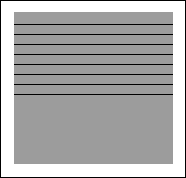


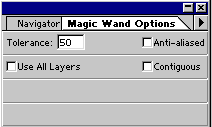 We
have to pause for a moment and look at the Magic Wand Options window,
shown here. You can gain a lot of control over the the Magic Wand tool
with these few choices. Remember how our selection was picked up just
from the active layer? Activate Use All Layers, and all similar color
from all layers will be included. You can select both green rectangles
with one click (if Contiguous is unchecked read on for more).
We
have to pause for a moment and look at the Magic Wand Options window,
shown here. You can gain a lot of control over the the Magic Wand tool
with these few choices. Remember how our selection was picked up just
from the active layer? Activate Use All Layers, and all similar color
from all layers will be included. You can select both green rectangles
with one click (if Contiguous is unchecked read on for more).
URL: https://www.webreference.com/graphics/
Created: September 28, 2000
Revised: September 28, 2000
 Find a programming school near you