Photoshop Selections pg 3: Production Graphics with Wendy Peck at webreference.com
 |
Photoshop Selections: Selection Tools 2 | |
|
Lasso Tools (l to r): Lasso, Polygonal Lasso and Magnetic Lasso. |
Photoshop has the most powerful array of selection tools in the graphics world. Many are not used though, and it is only when you understand what all the selection tools can accomplish, that you are able to effectively use this power. We still have the three lasso tools to cover and make sure you do not miss the Quick Mask section of this tutorial. Keep your eye out for a full tutorial on Photoshop paths very soon, since Paths are very much selection tools. They would fit here, but I would rather handle that subject on its own, since there are many new concepts to learn. | |
|
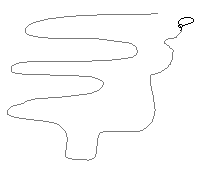
Top: The Lasso tool in action. In the lower image, a straight line has been created when the mouse button was released away from the starting point.
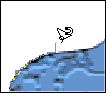
High magnification of the image shown to the right. Note how much easier it is to see where the selection boundaries should be. Photo © Tom Thomson Photography. Used with permission. |
Lasso Tool To use the tool, click and drag in the shape your require. When you release the mouse, the start and end points are automatically joined in a straight line, as shown in the sample at the left. Zooming in to a high magnification will usually return the best results when using the Lasso tool. Selecting the small tulip in the image at the left would be very difficult at actual size. The sample below shows how much easier it is to see the actual outline of the flower. At times, it can also be hard to discern where the outline of the actual object may be, and you will find that you must select roughly at actual size and then fine-tune at high magnification. See the next page on editing your selection for this technique.
The Lasso tool offers two options. Double-click on the tool to open the Lasso Tool Options Window. You can choose anti-aliasing, which is usually desired unless you require pixel by pixel accuracy. The Feather option is one I never use. You can feather your selection at any time, and I would prefer to concentrate on an accurate selection than where the feathering may affect. |
|
|
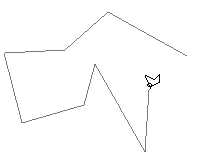
The Polygonal Tool in action. The lower image shows a curved portion that was created with the ALT or Option key pressed down, temporarily converting the Polygonal tool to the basic Lasso tool. |
Polygonal Lasso Tool To use, you simply click, move to the next anchor point, click, move to the next point, etc. To complete your selection, move your cursor close to the starting point. An o shape appears beside the cursor, signifying that the start and end point will be joined when you release the cursor. You can constrain your selection to horizontal or vertical lines by holding the SHIFT key down before you select the next point. If you press your ALT or Option key at any point in your selection process, the Polygonal Lasso tool converts to the Lasso tool, making it easy to do a combination selection as shown at the left. My ALT key was pressed at the lower right corner and released at the end of the curved section, returning my selection to straight lines. Toggle back and forth as required. The options for the Polygonal Lasso tool are the same as for the Lasso tool. |
|
|
The Magnetic Lasso tool snaps to the edge, even though the cursor is quite far away.
Note the o shape on the cursor, indicating that a closed selection will be created when the mouse is released.
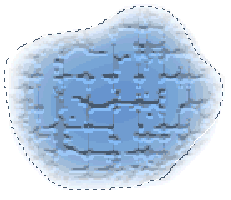
Even a slight feathering on the edge is enough to make the magnetic properties fail.
|
Magnetic Lasso Tool The top image at the left is an example of a perfectly behaving Magnetic Lasso tool. Note how far the cursor is from the edge. The selection boundary is snapping to the edge as I drag the mouse carelessly around the area. In the second image, note how tightly the selection is against the edge. Also note the o by the cursor indicating that the start and end points will be joined when the mouse is released. Pretty slick ... when it works. This was an ideal edge for the Magnetic Lasso tool to work. In fact, it was custom designed to show how the tool works and I made sure that there was plenty of contrast and nothing to distract the selection. Take a look at the next image though. As soon as I added feathered edges to the shape, the magnetic properties became confused. Unless this tool can get a solid grasp of the edge, it is almost impossible to control. In this case, I would have been better with a plain Lasso tool selection. Or, better yet, if you have the background clear for selection, the Magic Wand. Select the background and choose Select>Invert from the main menu. If you are determined to work with this tool, though, you can adjust the parameters to customize the magnetic properties. The Feather and Anti-aliased options are the same for the Magnetic Lasso tool, as for the first two lasso tools. The remaining options, however, are strictly to guide the magnetic snapping to the edge. The Lasso Width refers to how close you must bring the cursor to the edge for the snap to take place. Taking this value down too low, though, kills the effect, since you must trace almost as carefully as you would with the Lasso tool. The Frequency represents the number of anchor points that will be created as you complete the selection. A lower number will result in a less accurate, but smoother selection. Finally, Edge Contrast is the amount of difference you expect the magnetic properties to recognize. If you are selecting from an image with high contrast, this number can be increased. A low contrast image will require that you reduce this number. |
|
|
Make sure you also see Masks
are Easy ... Really. Masks are selections and the two articles work
hand in hand.
|
Before we leave the selection process and move onto editing your selection, I want to take a look at a very powerful trick for making selections. Read on to learn how you can put channels to work for you. |
|
|
|
Photoshop Selections Tutorial IndexPhotoshop Selections: Back to Basics
|


URL: https://www.webreference.com/graphics/
Created: September 28, 2000
Revised: September 28, 2000
 Find a programming school near you