Photoshop Selections pg 4: Production Graphics with Wendy Peck at webreference.com
 |
Photoshop Selections: Selecting with Channels and Color Range | |
|
Each channel offers varied contrast levels, the most important element for using the Magic Wand tool.
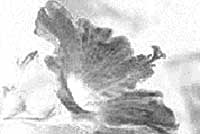
The top image is the Red channel of this image, and has sufficient contrast for a one-click Magic Wand tool selection. Photo © Tom Thomson Photography. Used with permission. |
Often, no matter how hard you try, it is nearly impossible to get the selection you require. Try using just one channel to make a selection. Take a look at the Channels palette as shown at the left. You see the original RGB image at the top, with reasonable contrast for selection. But look at the Red channel. The flower is standing out very clearly against the background for exceptionally efficient selection. To use a color channel for selection, activate the desired channel and work on the grayscale representation on your canvas as you normally would. In this case, one click of the Magic Wand tool, with a Tolerance of 120, delivered a perfect selection of the flower. The images at the left show the results of a one-click Magic Wand selection with the same tolerance setting. Note how the Red channel (first image) creates a perfect selection, while the RGB selection fails to select some interior areas. Often, you also want to see what is happening in the RGB image as well as the specific channel. You can choose View>New View from the main menu. This will give you two different views of the same image. Changes you make in either view are reflected in the other. In the sample below, the RGB image is shown on the left, and is currently active. You can see the selection that I made when the right image was the active document, with only the Red channel active. Although I had to resize and compress this image for display here, you should be able to see that the file name is flower.psd in both views.
Always keep channels in mind when you are using automatic selection, like with the Magic Wand tool, or the Magnetic Lasso Tool. Even when using the basic Lasso tool, one of the individual channels may offer better visibility to select an exact area. |
|
|
To create this effect, I used the color range function to create a selection of one color with a Fuzziness of 100 (the range of color that will be selected). I then copied the selection and pasted it into a new document. A quick, easy to control method of creating an illustration look from a photograph. Although this was created with a one color selection, you can easily select many colors to create the same type of image from a photograph with more color variation. |
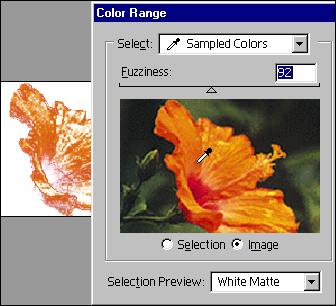
Select a color range Make sure that you do not have an active selection, and choose Select>Color Range. The Color Range window will open. Keep in mind as we work along, that you are simply creating a selection, using color as a selector. Think of it the same as the grow or similar command, but completely within your control. First, make sure that the Image option is active in the middle of the window. This is where you will choose the colors. Move the Color Range window so that you can see your canvas as shown below.
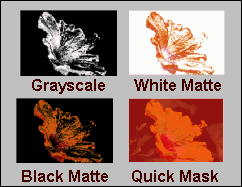
You have several choices for a selection preview, which will be shown on your canvas. I have chosen White Matte here, and usually find that the White Matte or Black Matte provides the clearest preview for me. You may also choose Grayscale or Quick Mask as a preview method. I prepared a sample (see left) of all available selection previews for the same selection, so you could compare the options side by side. Again, I remind you that we are not changing the image, just creating a selection. The image that appears on your canvas is simply showing which areas are selected.
|
|
|
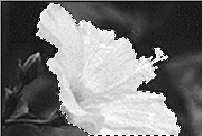
This image shows how the selection boundaries appear for the selection used to create the image shown immediately above this one.
|
Finally, we get to choose a color. Choose one of the eyedropper tools in the Color Range windows. For a single color, choose the first eyedropper. To add new colors, choose the + eyedropper. To remove selected colors, choose the eyedropper. Follow the selection in your document screen. You can switch preview types at any time. The image below shows a single color selection with a White Matte preview. You can adjust the range of color that will be selected by using the Fuzziness option. This function is similar to the Tolerance setting for the Magic Wand. Lower values will include a small range of color. Higher values will include a wider range of colors with the selection.
When you are satisfied that you have the selection you require, click OK. The selection boundaries will display as shown at the left. The selection that you see does not illustrate the full selection, however. Compare the image above to the selection displayed to see the difference. That is why it is very important to follow the preview as you make your color selection. |
|
|
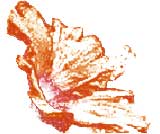
Image created from a one color selection. |
To choose all the Reds, Greens, or Blues, etc., in your image, click on the drop-down box and choose a preset color. Check your preview to see which areas have been selected. Experiment with this selection feature. It seems complicated, but if you work through it step-by-step the first time, it is really quite simple. Of course, the results are not always predictable, since you are working with shades of color, but that is what can make it an exciting selection feature, and very useful if you are trying to customize color adjustment. The image at the left was created by selecting only the yellow from the flower image. I saved the selection and then copied the selection channel to a new document (see next page for instructions on sharing selections). I then loaded the selection in the new document and filled the selection with black. |
|
|
Make sure you also see Masks are Easy ... Really. Masks are selections and the two articles work hand in hand. |
So now you have the basics of Selection tools in Photoshop. Paths is another very useful tool for creating selections, but I will be handling that topic separately in the near future. We will move on now to editing your selection boundaries. Photoshop does offer many post selection choices, and you should be very familiar with each one. Getting a good selection is most valuable when you can manipulate it to do what you require. |
|
Photoshop Selections Tutorial IndexPhotoshop Selections: Back to Basics
|


URL: https://www.webreference.com/graphics/
Created: September 28, 2000
Revised: September 28, 2000
 Find a programming school near you