Type Right for a Pro Look pg 4: Production Graphics with Wendy Peck at webreference.com | 2
 |
Type Right for a Pro Look: PaintShop Pro Gradient Fills | |
|
|
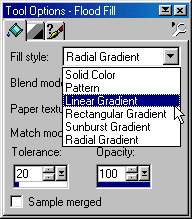
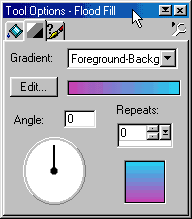
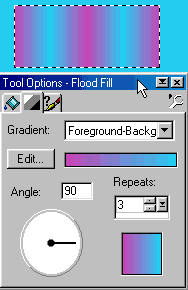
PaintShop Pro offers total flexibility for creating and using gradient colors for faster selections. You can use predefined gradients, or more useful, create your own and save the results for later use. Gradient fills are implemented through the Flood Fill tool. Select the tool and open the tool options window. Choose the type of gradient you desire from the Fill Style drop down menu. The choices are Linear, Rectangular, Sunburst and Radial gradients. Note: The radial and sunburst styles can be confusing, since most programs offer a fill like the sunburst style under the name of radial. If you are following tutorials or instructions written for other programs, keep in mind that when a radial gradient is called for, the sunburst style will deliver the correct results. Click on the second tab to reach the color editing menu. Choose Foreground to Background for the Gradient for this sample. Choose the Foreground and Background color you desire. For this sample, the pink is the foreground color and the light blue the background color. The angle of the fill must be set in this dialog box, since the gradient is applied with a single click - not a directional click and drag. Choose 180 for the angle if you wish to have the gradient start at the top with the pink. Choose 90 and the gradient will place the pink on the left, and 270 places the pink on the right. You also have the option to have the gradient fill repeat. This can save a lot of custom set up if you wish to create a repeating pattern, such as you might use for undulating waves. Specify the number of gradient pattern repeats by specifying a Repeat value. I have included a sample here of a pattern that is repeating three times. The preview sample in the bottom right hand corner shows the same gradient fill with a repeat value of 0. Once you have your gradient fill set, create a selection and click inside to fill. It makes no difference where you click, as the fill settings are taken from the Gradient Fill Options window. If you wish to change the fill, undo the fill, make your adjustments to the gradient fill and repeat.
|
|
|
|
||
|
|
Multiple colors You can start from scratch with a new gradient fill, or start from one of the preset fills provided. Click on the Gradient Options tab in the Flood Fill Options window. Choose Edit to create or edit a gradient fill. Click New to create a new fill. Give it a name and create your fill. To start from a preset gradient fill, select the fill and choose Copy. You will be prompted for a name for your new fill and the attributes of the copied gradient will remain. |
|
|
|
|
|
|
|
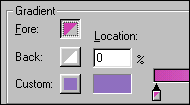
Pay attention to this next part, and you will have total freedom with PaintShop Pro gradients. When creating a custom gradient, you will work with markers, the small rectangles under each of the gradient control bars. Clicking on a marker makes that marker active (see the dark triangle at the top of the marker that indicates it is active) and any changes you make will apply to only that marker. You have three choices to apply to the active marker. The first is Fore, or foreground color. The second is Back, or background color. Finally, the Custom option gives you access to any color. If you chose Fore or Back, the marker will take its color from the current foreground or background color when you apply the fill. If you need to specify exact colors that are not affected by current foreground or background colors, you must use the Custom option. The current foreground or background color may be the one you need, but you still must set the Custom setting to that color to define a gradient that will not change when your foreground or background colors change. Markers set to Fore, or foreground color have a small triangle in the top left corner with the current foreground color. Markers set to Back, or background color have a small triangle in the lower right corner with the current background color. Markers set with a permanent color have a solid color fill representing the marker color. |
|
|
Click below the gradient color bar to add a color.
Adjust the blend center position by clicking and dragging on the diamonds above the gradient color bar.
Adjust the start or end point for the gradient fill by dragging the first or last color marker to a new position. |
Add colors and adjust position If you do not want the colors to blend in the center between two colors, you have the option to change the position of the color blending. Click on the diamond above the gradient color bar and drag to set the center for the color blend. The sample at the left shows the blend center moved far to the left. You can also set the position for the start and end point for the gradient fill. Click and drag the start or end color marker to a new position. Solid color will fill the area before the first or after the last marker when the position is changed. With these tools, you can create a gradient fill with any color. Carry on to see how you can add transparency to your fills as well as save and share gradient fills. |
|
|
|
|
|
Type Right for a Pro Look Tutorial IndexColor Power with Gradient Fills Start |
URL: https://www.webreference.com/graphics/
Created: May 27, 2000
Revised: May 27, 2000


 Find a programming school near you