Type Right for a Pro Look pg 3: Production Graphics with Wendy Peck at webreference.com | 2
 |
Type Right for a Pro Look: Photoshop Gradient Transparency | |
|
|
Creating color bursts at will is exciting, but when you add the power of transparency to your color, you unleash all the artistic potential of computer graphics. Creating transparency is not hard, but there are several different ways to create see-through effects. We will look at each one individually. No matter which way you need a graphic to have transparency, Photoshop can deliver. For a very simple transparency, you can make the entire gradient fill transparent with the Opacity command in the Gradient Fill options window. Simply choose the Opacity you desire and any selection you fill will have this transparency. You could accomplish the same effect by making the layer transparent, but there may be times you wish to have objects on the same layer with different transparencies. However, you are not bound to having consistent transparency with a gradient fill. |
|
|
|
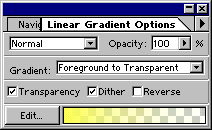
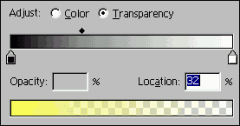
One of the most useful gradient fill settings is the Foreground to Transparent setting in the Gradient Options window. With this option your foreground color will fade away at the end of the gradient. Make sure that the transparency option is selected and choose Foreground to Transparent as the Gradient. As with any gradient fill, you can edit how the color fades to transparency though the Edit button in the Gradient Options window. Click on the Edit button in the Gradient Options window to open the Gradient Editor window. Make sure the Adjust>Color option is active. For pure color fading to transparent, set each color stop to the foreground color. The start color stop will be set to the foreground color by default. Click on the end color stop to select, then click on the "F" selection as shown circled with white. This will change the end color to the foreground color as shown. The lower color window provides a preview of the current gradient. To adjust where the transparency starts, click on Transparency, which will change the editing screen from color to transparency editing. The first color window will change to a grayscale representation, since it is now showing only the transparency. (The color preview window remains the same and can be used to check the results of transparency editing.) For transparency, black represents no transparency, and white represents full transparency, or invisible. Compare the grayscale image to the color image below and you will see the transparency increasing as the gray bar lightens. You can adjust how quickly the transparency occurs with the diamond above the slider. Click on the diamond to activate and drag to the desired position. In this sample it has been dragged to the left from the default position.
|
|
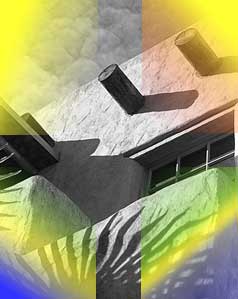 |
Finally, you can start and stop transparency or color at any point. To create a new start or stop point for color, make sure the Adjust>Color is active and click and drag the start or end color to the position you would like the gradient to start or end. Use the color preview window to confirm that you have the effect you desire. Likewise to adjust where transparency starts or stops, select Adjust>Transparency and click the start or end stops to the desired location. Once you understand the basics of this option, you can create wonderful transparencies that contain many colors and varying degrees of transparency. The sample at the left, which was not meant to look pretty, but to show the power of the transparency option, features four different Foreground to Transparent variations. There is no limit to the effects you can create when you are comfortable with the color and transparency settings for Photoshop's gradient fills.
|
|
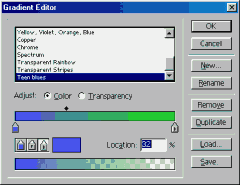 |
Saving a gradient fill Open the Gradient Editor window. Choose New from the menu on the right side of the window. Give your gradient fill a name in the window that pops up and click OK. Create the gradient that you desire and click OK. The new gradient is now available to you from the drop down and will remain. To remove a gradient from the list, select it in the Gradient Editor and choose Remove. You can also save one or many gradient fills to a separate file for sharing with other team members or to load to another computer. Select the gradients you wish to save and choose Save. Specify a location and file name. To load a gradient, choose load in the Gradient Editor and select the gradient file. You will have the choice to append, or add, to the default gradients, or replace the current defaults. |
|
|
I could spend several more pages going over the different variations possible with the gradient fills and transparency, but you now have the basics. This is one technique that I recommend that you devote as much practice time to as you can spare. Gradient fills results can be unpredictable, and the more practice time you can devote to learning which settings create which results, the more you will be likely to use the techniques for your production work. And once you have mastered the "gradient language" you have a powerful ally for quickly-produced, dynamic graphics. Increase that productivity by saving your successful gradients. Chances are, you will not use that exact combination again, but you could well use the same color distribution and transparency setup. Just select your saved gradient, choose Duplicate from the Gradient Editor window, give your new gradient a new name, and select new colors. Most of the work is already done for you. Next time we will look at gradients in vector programs, so if you also work with Illustrator, Freehand or CorelDraw, make sure you check back. Vector programs offer even more choices for gradient color. And if you use Fireworks, check the menu below. |
||
|
|
Type Right for a Pro Look Tutorial IndexColor Power with Gradient Fills Start
|


URL: https://www.webreference.com/graphics/
Created: May 27, 2000
Revised: May 27, 2000
 Find a programming school near you