Type Right for a Pro Look pg 2: Production Graphics with Wendy Peck at webreference.com | 2
 |
Color Power with Gradient Fills: Gradient Fills in Photoshop | |
|
|
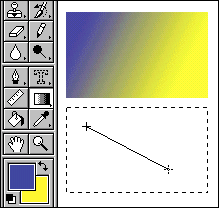
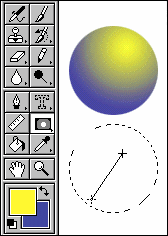
Basic Default Fills Click and drag to set the range for the tool. The foreground color will start at the first mouse position, and the background color will end where you release the mouse. If you do not start or end at the edge of the selection, solid color will fill the remaining area. You can start and/or end outside the selection if you wish. You can use your SHIFT key to constrain the angle of the fill to 15 degree increments. Note: For clear illustrations and faster downloads in this tutorial, I have elected to use GIF format at less than 256 colors, which will often create banding in the samples that I would never accept for a project. Radial and other fills work in the same way. The background color is placed where the mouse is first clicked and the background color is placed where the mouse is released. In the radial fill example shown here, mouse was clicked at the upper right corner and dragged to the left. |
|
|
|
Text with gradient fill As with any gradient fill, you can start or end the fill outside the selected area to reduce the color effect at the beginning and/or end of the fill. I have included a sample of the same color combination as the first text sample, but with the gradient fill started and ended well outside the selection area. Note how the second sample has no bright blue or yellow, since that part of the gradient fill falls outside the selected area. (The foreground and background colors have been reversed from the first to the second sample.). |
|
|
|
||
|
Click on the Gradient drop down to choose preset gradient fills. Although presets are rarely perfect for any job, they are good starting points and worth studying to understand how multicolored gradients are constructed.
Adding new colors is as simple as a mouse click to add an icon and a double click to choose the color. Click and drag the icon to move the color.
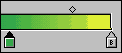
Change how quickly the colors blend with the diamond shapes on the top of the color slider. Click and drag to set.
A three color custom gradient filled applied with the Radial Gradient tools |
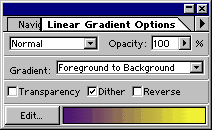
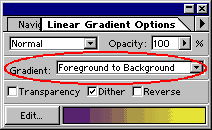
Add more colors Select the Gradient tool. Open the Gradient Options window by double clicking on the Gradient Tool in the toolbox, or by choosing Window>Show Options. We can control an unlimited number of gradient fills with this option box, including transparency (we will look at all transparency controls later). For now, we are interested only in adding more colors to our gradient fill. There are several preset color combinations in the Gradient drop down menu, as shown circled at the left. As with most presets, however, they never seem to fit perfectly into any project. Fortunately, creating custom gradient fills is not difficult. Click on the Edit button to open the Gradient Options window to open the Gradient Editor. You will see the Background color on the left of the top color window, with the foreground color at the right. The icons below this color slider are marked with an "F" for foreground and a "B" for background. To add a color, click on the bottom edge of the top color slider and
a new icon will be added. This icon represents a new color which we
can change by double clicking on the new icon. The color window will
open, and you can select any color. You can also adjust the position of the colors and how quickly they fade into the next color. Click and drag the color icon to adjust position of that color. The small diamond shapes on the top of the color slider window adjusts how quickly the color fades into the next. When it is active, the diamond is filled with black. To remove a color, simply select the icon of the color you wish to remove and hit the Delete key. Since the color window gives you a real time preview of the gradient fill you are creating, you can quickly create the perfect gradient. Time experimenting with custom gradient fills is time well spent. You quickly develop an instinct for the perfect combination of colors to add depth and interest to your graphics. But we are not finished yet ... you can make this powerful color even more versatile with transparency. Carry on to learn how much flexibility Photoshop offers with transparency. |
|
Type Right for a Pro Look Tutorial IndexColor Power with Gradient Fills Start
|


 You
can also change the background and foreground colors in the same way.
The active color icon has a dark triangle at the top as shown here.
The green color icon is active.
You
can also change the background and foreground colors in the same way.
The active color icon has a dark triangle at the top as shown here.
The green color icon is active.
URL: https://www.webreference.com/graphics/
Created: May 27, 2000
Revised: May 27, 2000
 Find a programming school near you