 |
 |
CorelDraw 101: All About Fills 2
Using Pattern Fill Options
|
| |
|
|
|

|
|
Options Screen Area
Create a rectangle exactly 4" by 4". Select with the Pick
Tool. Click on the Fill Tool in the Toolbox to open the fly-out. Choose
the third icon in the fly-out to open the Pattern Fill window. Look
to the lower portion of the window to find all the options available
for pattern fills. The options area is highlighted with a yellow border
in the illustration to the left.
|
| |
|
|
|
|
|
Default Values
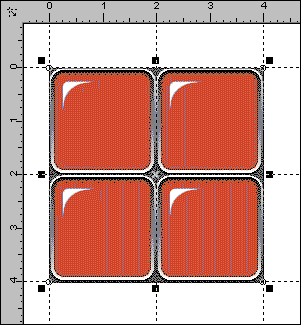
All pattern fill types have default settings of 2" for Size and
0 for all other Options. We can adjust the position, size and appearance
of pattern fills through the various options in the lower part of the
Pattern Fill Window. The sample to the left shows a perfect 4" x 4"
rectangle filled with a pattern fill at the default size of 2".
This pattern makes it easy to see one repeat. Note the guidelines placed
every 2". All examples in this tutorial will be built with this
default setup.
|
| |
|
|
|
|
|
Adjust Pattern Fill Size
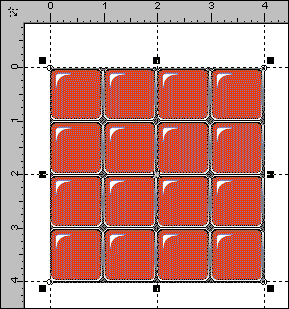
Change the value to 1" for the Size option. Note that there are
now four occurrences of the pattern repeat within the 2" sections
marked by the guidelines. The pattern repeat now occurs every 1"
by 1" square, allowing 4 repeats in a 2" by 2" area.
|
| |
|
|
|
|
|
Change Row or Column Offset
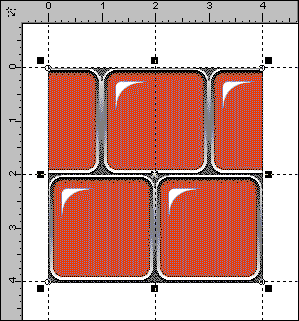
The default setting for the pattern fill places one row of pattern repeats
directly on top of the previous one. You can change the offset to make
the pattern repeat stagger. Change the value to 50% with the Row option
active to achieve the results to the left.
|
| |
|
|
|
|
|
Change Pattern Position
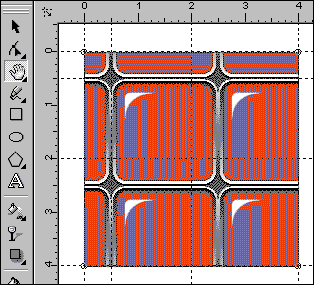
You can also set the position for the pattern to start. Set the x value
to .5. This will move the pattern .5" to the right. Use negative
values to move to the left. Set the y value to -.5. This moves the pattern
.5" down. Note the extra guidelines placed at the .5" position.
|
| |
|
|
|

|
|
Skew Pattern Fill
You can skew the pattern fill, or tilt it to the right or the left.
Enter -30 as the value in the Skew option within the Transform area
of the Pattern Fill window. The pattern tilts at 30 degrees to the right.
An entry of 30 would have tilted the pattern 30 degrees to the left.
|
| |
|
|
|
|
|
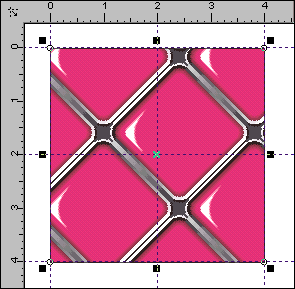
Rotate Pattern Fill
You can also rotate the pattern fill. Enter a value of 45 in the Rotate
option within the Transform area of the Pattern Fill window. Note how
the pattern is now at a diagonal angle to the rectangle.
|
| |
|
|
|
|
|
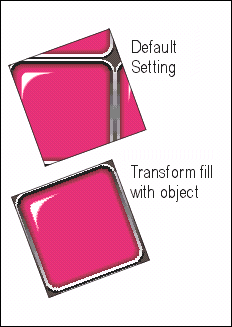
Transform Fill with Object
When you transform your object, i.e., resize or rotate, the pattern
fill remains as it was before the object transformation. See the illustration
to the left of two identical rectangles. The top example shows an object that
was filled and rotated. The pattern did not rotate. To keep your pattern
consistent no matter what editing you do to your object, check Transform
Fill with Object in the lower left corner of the Pattern Fill window.
See the lower sample to see how the pattern rotated with the object.
|
| |
|
|
|
|
|
Back to start
CorelDraw 101: All About Fills 2 Tutorial Index
Pattern Fill Overview
Using Preset 2 Color Fills
Custom 2 Color Fills
Preset Full Color Fills
Loading Full Color Fills
Using Bitmap Pattern Fills
Loading External Bitmap Fills
Using Pattern Fill Options
Creating Texture Fills
        
|


 Find a programming school near you