Pro Edges pg 8: Production Graphics with Wendy Peck at webreference.com
 |
Pro Edges 8: CorelDraw Ragged Edges | |
|
Photo with Artistic Media Tool border applied.
Artistic Media border applied with gray outline and black fill. For a complete set of step-by-step tutorials for the most important features in CorelDraw, see my CorelDraw 9 Basics series.
Images provided courtesy of EyeWire. Images © Eyewire and Internet.com and may not be reproduced in any way without prior written notice. |
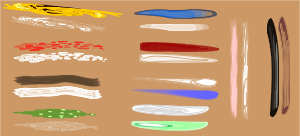
Almost every third party edge filters package contains several ways to make photo edges ragged. Although I tend to work well with ragged or casual looks naturally, most of the ragged edges I see are quite intrusive on the photo. In my book, the image should not be there if it is not important to the message. When all attention is drawn to the edge, you have lost your graphic benefit. CorelDraw's Artist Media Tool offers an almost instant way to create ragged borders that do not draw from the image. I have included some samples using default Artistic Media Tool styles. The top or left image shows the default color for the style. The second image has had the outline or fill changed.
When these effects are applied to the edges, you can get the appearance of rough photo edges, or with added color, a charcoal or pastel border effect. The second photo at left has a mid-gray outline and a black fill. Both effects have been created by drawing a rectangle and applying the Artistic Media Tool effect. You have three choices to add an Artistic Media effect to a photo edge: freehand drawing with the Artistic Media Tool; draw a line and apply the tool or draw a rectangle and apply the tool. In the sample below, the same Artistic Media Tool effect has been applied to all object. The top left image is drawn freehand with the Artistic Media Tool. The lower left shows a line and then the line with the Artistic Media Tool applied. The image on the right shows a rectangle and then the same rectangle with the effect added.
Freehand Drawing Draw your freehand line. This is a great technique if you want total control over where the ragged edges are placed. Once created the line is called an Artistic Media Group, and can be manipulated like any other graphic in CorelDraw including separating and ungrouping for total control. In most cases, you can leave the group intact and specify fill or outline color. Applying the Artistic Media Tool to a Line or Rectangle Have some fun with this feature. You can use any shape as the basis for the Artistic Media Tool. Once you have designed the first effect, copying is quick and easy. |
|
|
|
Pro Edges Tutorial IndexPro Edges Start
|


 Choose
the Artistic Media Tool, shown here in the Curve Flyout. In the Property
Bar near the top of your screen, choose Brush (shown depressed), pick
your style from the flyout and adjust width if desired. (You can also
open the Artistic Media Docker.)
Choose
the Artistic Media Tool, shown here in the Curve Flyout. In the Property
Bar near the top of your screen, choose Brush (shown depressed), pick
your style from the flyout and adjust width if desired. (You can also
open the Artistic Media Docker.)
URL: https://www.webreference.com/graphics/
Created: Feb. 3, 2000
Revised: Feb. 5, 2000
 Find a programming school near you