3D Animation Workshop: Lesson 16: Bevels and Details | 2
|
|
Lesson 16 - Bevels and Details - Part 2
All high-end modeling applications (and some low-end ones as well) have powerful BEVELING tools. We readily think of bevels as slanted planes connecting a raised surface to the remainder of an object. Bevels on the edges of mirrors add an elegant touch. But beveling is a much more general idea in 3-D modeling.
Beveling a polygon involves two logically independent steps which are completely severable. First, an interior polygon must be created within the bounds of the original polygon.
Here is a wireframe render of a square.

And here, an interior square has been created as part of the beveling process.

Don't let the wireframe deceive you! This is a flat, strictly 2-D object, though our mind will try to interpret the image to see the interior polygon as either in front or behind the outer square. Note why this is so. The diagonal lines that connect the interior vertices to the exterior vertices are readily interpreted by our minds as the effects of perspective discussed in the last lesson. In fact, it's very hard to see the image for exactly what it is--an arrangement of lines all contained on a single flat plane.
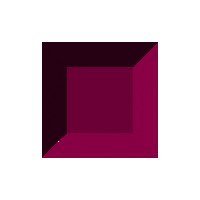
Notice another important point. There are now 5 separate polygons. The original exterior square has disappeared (at least as a defined polygon in the model), and the new model is a central square surrounded by four quadrangles. The outer sides of the four quadrangles effectively preserve the original square, but the original square is no longer defined in the model. The polygon list in the model file will no longer contain a polygon made of only the four most exterior points.
The second step of the beveling process involves translating the new interior (or inset) polygon backwards or forwards in the direction of its NORMAL. Thus we can bevel out.

And we can bevel in.
Hey! Which one is which? Forgive me if I keeping beating the same issue too often. 3-D graphics depend on illusions to persuade us that there is depth behind the surface of the computer screen. These illusions rely on the natural ways that our mind interprets visual data about angles and shadow. But these interpretive instincts can often confuse us. Just because a model has been created correctly in the 3-D space of the computer doesn't mean that it's always going to be comprehensible after rendering.
Changing the angle at which the objects are viewed, will help us to distinguish between the two bevels. Lightening up the color helps also.
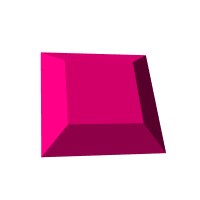

Take a moment to consider why these changes make a difference. When looked at from face-on in the earlier renders, the geometry remained regular. The two interpretations (inward and outward) were equally likely because we had no information about the origin of the light source casting the shadow. In the new renders, the change of angle distorts the apparent geometry and in each case our mind is given a choice between a more distorted and less distorted interpretation. Our minds naturally gravitate to an interpretation in which the "true" geometry of the object is the most regular and least distorted. Try to force yourself to see the "wrong" interpretation so that you understand how distorted these objects must be to support this interpretation.
The use of a lighter color gives more range to the play of shadow. The earlier render started with a fairly dark color and so there was little room left for a palette of grays. The lighter pink color allows a broader range of shadow shades, and therefore provides more data to interpret the object's geometry and its position with respect to the light.
Now lets organize our polygons into two different surfaces, and assign them different colors.
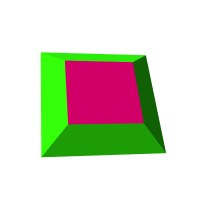
This should be enough to provide a basic insight into how the flat inset surfaces of the chest were created, along with the salmon colored edges.
Beveling is not limited to quads, or even to simple or regular polygon. In fact, the most common use of beveling is undoubtedly in 3-D text. We are accustomed to seeing text in 2D, and merely extruding the flat letters into blocks can confuse us. Beveling highlights the face of the extruded letters, keeping the text more readable.

Notice how the beveling creates light and shadows to define the front face of the text.
| To Continue to Part 3, or Return to Part 1, Use Arrow Buttons |
|
Created: August 11, 1997
Revised: August 11, 1997
URL: https://webreference.com/3d/lesson16/part2.html
 Find a programming school near you