3D Animation Workshop: Lesson 16: Bevels and Details
|
|
Lesson 16 - Bevels and Details - Part 1
Let's finish up with the pirate chest from the last two lessons, using the opportunity to explore a couple of important general topics in modeling.
Thus far we've done the heavy lifting, getting the basic shape of the chest and carving out the interior spaces. But the visual appeal of the chest is largely due to the exterior details, the different colored surfaces and geometric relief of insets and ridges.
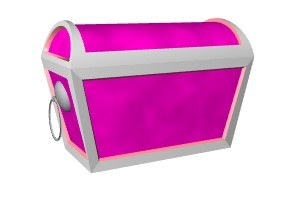
Look carefully at this image and try to imagine how this detail is created. In fashioning the basic shape in the previous lessons, the exterior was composed of very few, and very simple, polygons. The exterior of the box was simply four quadrangles for the sides and another for the bottom. The exterior of the lid was composed of a series of long quadrangles forming an arch (rendering as a smooth surface after the application of smooth shading), and closed at each end by a polygon in roughly the shape of a semicircle. You may want to look back over Lesson 14 and Lesson 15 to refresh your memory.
In the final render above, these simple surfaces have been broken up, assigned different colors and moved about to create relief. This assumes the possibility that a single model can contain multiple surfaces--so let's get this important idea clear right now.
The MODEL is our basic unit of thought. It is, as we have discussed before, a file containing (at a minimum) the geometric information about the surface of a object needed for rendering by a rendering engine. We started with the polygonal model--a model whose geometry is described by a mesh of polygon--and we discovered that using a polygon mesh did not prevent us from creating smooth curving surfaces due to the application of smooth shading in the rendering process. We later improved our explanation of a model. Many applications permit the model to be described directly by reference to smooth curves, a method called spline modeling. Where this is done, the model must still be converted to a polygon mesh before rendering, because the overwhelming majority of rendering engines are designed this way. The process of breaking pure curve information up into polygons is called tessellation, and is a sort of sampling process, like scanning a printed image. This is typically done automatically by the application, which computes a sufficient number of polygon to create a smoothly rendered object under the circumstances.
Applications that permit spline modeling will typically also permit direct polygonal modeling. The bottom half of our chest contains no curves and will be a polygonal model in any case. The lid contains a curved surface and so could have been spline modeled--though I modeled it using a polygonal modeler. But if we need to break up a single model into more than one surface, we will need a polygonal model. Multiple surfaces are possible where the model file is designed to assign different surface names to different polygons in the mesh. A surface defined only by spline curves cannot be subdivided into different regions. Thus dividing up a model into different surfaces requires a polygonal mesh model. This model can either be created directly, or if it began as a spline model, must be converted to a polygon mesh before assigning multiple surfaces.
There's a lot of meat in the last two paragraphs, and you may want to come back to it later if it didn't all sink in. For now, it's enough to understand that a polygon model is necessary if we are to divide a model into separate surfaces.
But why would we want to divide a model into separate surfaces? One reason may be to assign different colors to different areas of the model. The separate surfaces can have different surfacing information, including DIFFUSE COLOR. We've learned a little about applying TEXTURE MAPS to create color detail on the surface of an object, and it could be done here with our chest--but it would be difficult to create such a map, and even harder to edit it to play with different color combinations. It is much easier to assign different colors to separately defined surfaces.
The chest and the lid have bee created as separate models so that the lid can be rotated (opened and closed) separately from box. But each of these models has been divided up into surface names, assigned to groups of polygons. The inset panels were all assigned the same purple surface color. The polygons constituting the edges were all collected under a single surface and assigned a white color. The thin beveled faces connecting the edges to the inset panel were all assigned a pink, or rather salmon colored surface. And the interiors of both objects, although not visible in the image above, were assigned a common surface. This structure divides our objects in a logical and useful way.
But how did we break up the objects into smaller polygons in the first place?
| To Continue to Parts 2 and 3, Use Arrow Buttons |
|
Created: August 11, 1997
Revised: August 11, 1997
URL: https://webreference.com/3d/lesson16/
 Find a programming school near you