Podcasting with Audacity: Creating a Podcast With Free Audio Software | Page 3
[previoous] [next]
Podcasting with Audacity:
Creating a Podcast With Free Audio Software
Listening to Your Audio File
As you edit your Audacity file, you're going to listen to it as well. In fact, you can't edit an audio file without also listening to it.
The Play and Stop buttons will be your friends. Click on the waveform to select a place from which to start listening, and then click the Play button, or use the Spacebar as a handy shortcut. When you hear something problematic and need to cease play, click the Stop button or use the Spacebar again, which toggles between Play and Stop.
Selecting a Portion of Audio
If you want to listen to a particular chunk of audio—from 1:30 to 2:15, for instance—select that part of the waveform and then click Play. Audacity plays only the selected area of audio.
Of course, that brings up the question: How do you select part of a waveform? There are actually several ways to do this.
If you want to select everything, press Ctrl+A (or Â-A on a Mac); to deselect everything—in other words, to select nothing—press Ctrl+Shift+A (or Â-Shift-A on a Mac).
If you're going to use the mouse, you first need to click the button on the Tools toolbar for the Selection tool, displayed in Figure 5.12.

Now that you're in Selection mode, click on the spot in the waveform where you want to start, and then drag to the right or left until you reach the end or beginning of the area you want to define. If you want to extend your selection range after you've already defined an area, hold down Shift as you left-click and drag.
If you're a keyboard person, or if you just want tighter control over the selection process, move the waveform's cursor to where you want to start your selection by using the left arrow to move left and the right arrow to move right. When the cursor is in its starting place, use Shift+left arrow to move the selection area to the left, and Shift+right arrow to move the selection area to the right.
Keep in mind that you can use both to expand the same selection area; in other words, you could use Shift+right arrow to expand a selection forward in time, and then use Shift+left arrow to expand the same selection backward in time, creating a larger overall selection area. If it's confusing, try it with one of your audio files, and it will become clear.
If you go too far to the left and want to back up to the right, use Ctrl+Shift+right arrow; if you go too far to the right and want to back up to the left, use Ctrl+Shift+left arrow (Mac users, substitute  for Ctrl).
Where did I find out all these cool time-saving keyboard commands? They're all right there in front of you—just go to Preferences, Keyboard, and you can see, and even modify, the entire list. If you want to use Audacity to its maximum productivity, you need to learn as many keyboard shortcuts as possible.
Using the mouse can be the right thing to do at times, and using the keyboard can help you be more accurate, but if you want the absolute highest precision, you'll want to use the Selection Bar.
When you first view the Selection Bar, pay special attention to the Selection Start and the End/Length drop-down menus, shown in their default states in Figure 5.13.

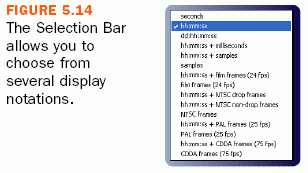
By default, the Selection Bar displays—and lets you change—hours, minutes, and seconds. This might sound like it's fine, but when you need precision to choose a specific area of an audio file, you'll quickly find that it's just not good enough. You need more specificity. Fortunately, the developers of Audacity realized this need. When you click on either drop-down menu, you'll see the menu displayed in Figure 5.14.


Now you can make precise selections. To change any of the numbers displayed in the Selection Start or End/Length, click on the number you want to change and use your up or down arrow keys to increase or decrease the number. As you change the number, others around it may change as well; in other words, if 09.514 seconds is displayed, and you move the 5 up five places, the number will change to 10.014 seconds. You can also change adjacent numbers by moving between them with the right and left arrow keys, and then use the up and down arrows to change the actual values.
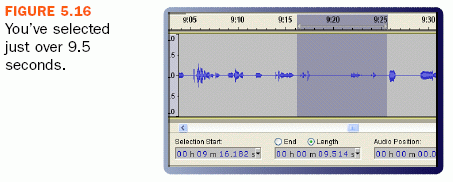
The difference between altering the End and altering the Length is best seen with examples. Let's begin with a selected area of about 9.5 seconds, illustrated in Figure 5.16.

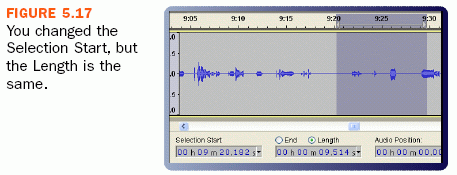
The default is Length, so let's use that first. The length is set to 9.514 seconds, so you are telling Audacity that you want the length of your selection to remain 9.514 seconds, no matter how the Selection Start changes. In Selection Start, click on the 6 in 16 and then press your up arrow key four times, advancing the Selection Start to 20.182, which you can see in Figure 5.17.

You've advanced the start of the selection forward by four seconds, but the length of the selection hasn't changed, and is still 9.514 seconds.
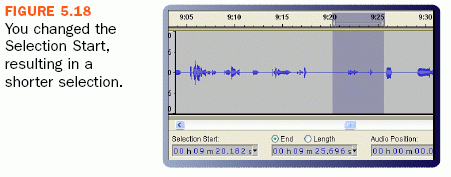
Instead of choosing Length, what if you had instead used End? In that case, End would change to show the time that Selection Start, the selected area stopped: 9 m 25.696 s. If you then clicked on the 6 in the 16 in Selection Start and pressed the up arrow four times, advancing the Selection Start to 20.182, you'd see a different result, as shown in Figure 5.18.

This time you changed the Start but left the End the same, resulting not in a selection that is the same length and shifted, but instead in a shorter selection. Both have their place, and you'll know when you need one or the other. The important thing is that you now know how to tell Audacity to provide you with the exact selection you need.
Viewing Aspects of Your Audio with Zoom
What if you want to select three minutes of audio, but Audacity only displays 30 seconds? There are several ways around that issue as well.
To see your entire audio waveform inside your Audacity window, choose View, Fit in Window, or press Ctrl+F (Â-F on a Mac). Alternately, you can click on the Fit Project button on the Edit toolbar, which you can see in Figure 5.19.

Of course, if your audio file is 20 minutes long, you will definitely be able to see the three you want, but it may be tough to select exactly those three minutes. In cases like that, you want to use Zoom. You can use the Zoom In and Zoom Out buttons on the Edit toolbar, shown in Figure 5.20.

Zoom In shows you a progressively smaller and smaller section of the waveform, whereas Zoom Out shows you more and more.
Or you can use the Zoom button on the Tools toolbar, which you can see in Figure 5.21.

To use the Zoom button, just click on the waveform to move in, and Shift+click to move out. If you're zooming in and then zooming out quickly as you try to find the optimal area to select, this method can be a lot quicker than clicking back and forth on the Zoom In and Zoom Out buttons.
You can also use the menus—View, Zoom In and View, Zoom Out—but that's way too slow! Instead, use the keyboard commands: Ctrl+1 to Zoom In and Ctrl+3 to Zoom Out (Mac users, that's  for you). As for View, Zoom Normal (Ctrl+2 or Â-2, depending on your OS), that shows your audio file in increments of one second, with about one inch onscreen for every one second.
Finally, if you've made a selection, and you want to zoom in so just that selection area is showing in Audacity, use View, Zoom to Selection or Ctrl+E (Â-E for Macs). You can also click the Fit Selection button on the Edit toolbar, shown in Figure 5.22.

You can't edit your podcast if you don't listen to it first. The quicker you are at making selections, the faster your editing process will be, and you will get your podcast in front of the world sooner rather than later.
[previoous] [next]
URL:


 Find a programming school near you