Podcasting with Audacity: Creating a Podcast With Free Audio Software | Page 4
[previoous] [next]
Podcasting with Audacity:
Creating a Podcast With Free Audio Software
Deleting Audio
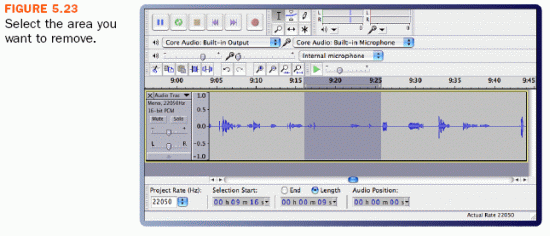
You're listening to your rough audio recording, and you hear a place in which you cough, pause for several seconds, and then cough again. That needs to be removed! Zoom in so that the area in question is comfortably visible, and then select the part you want to remove using the techniques discussed in the preceding section. Eventually you might have something that looks like Figure 5.23.

To remove the offending sounds, go to Edit, Delete (or Ctrl+K), and they will go bye-bye. When you do so, the audio in front of the area you deleted collapses backward to fill in the time gap that was created. To put it another way, if your audio file was 20:43 and you deleted 13 seconds, the file is now 20:30.
This is not the case if you use Edit, Split Delete (or Ctrl+Alt+K), however. In that case, when you delete a section of your podcast, you leave free space behind, acting as a DMZ between what are now two large hunks of your file. If your audio file was 20:43 and you use Split Delete to remove 13 seconds, the file is still 20:43, with a 13 second gap wherever you surgically sliced out a piece. In addition, you now have two separate audio clips that can be manipulated independently.
You can also replace the coughing with silence by choosing Edit, Silence (or Ctrl+L). This is more like Delete, in that you still have only one complete clip, unlike Split Delete, which results in two separate clips.
If you want to delete everything except the area you have selected, use Edit, Trim (or Ctrl+T). After using that command, the only audio left will be what you had previously selected, so this is a great way to get rid of 10 minutes of meaningless rambling to focus on the 45 seconds of great banter that you want to use.
Of course, you can use Undo if you suddenly realize that your coughing is sonic genius and must be preserved; to find out how, look ahead in this chapter to "Undo Your Mistakes."
Cutting, Copying, and Pasting Audio
Anyone who's typed a document on a typewriter and then graduated to word processing software has given thanks for Cut, Copy, and Paste. Those three simple commands have made life infinitely easier for writers, but they can also be used in Audacity to edit podcasts and other audio files as well.
To remove a selected chunk of audio and place it temporarily on your computer's clipboard, go to Edit, Cut, or press Ctrl+X (Â-X for Macs) on your keyboard. When you do so, the audio in front of the area you cut collapses backward to fill in the time gap that was created. To put it another way, if your audio file was
20:43 and you cut 13 seconds, the file is now 20:30. This is not the case if you use Edit, Split Cut (or Ctrl+Alt+X), however. In that case, when you cut out a section of your podcast, you leave free space behind, acting as a DMZ between what are now two large hunks of your file. If your audio file was 20:43 and you use Split Cut to remove 13 seconds, the file is still 20:43, with a 13 second gap wherever you surgically sliced out a piece. In addition, you now have two separate audio clips that can be manipulated independently.
What if you like the way you introduced your podcast—"This is the Audacity podcast, dedicated to all things audacious in open-source audio editing."—and you want to use that exact same bit of audio at the end of your podcast? No problem. Select those few seconds at the beginning of your file, choose Edit, Copy (or Ctrl+C), place the cursor on the waveform at the end of your file where you want the same audio to appear, and use Edit, Paste (or Ctrl+V).
Of course, you can use Paste after you have cut part of your podcast too.
Undo Your Mistakes
If you decide that you've made an error, it's easy to undo your action: Select Edit, Undo, or press Ctrl+Z.
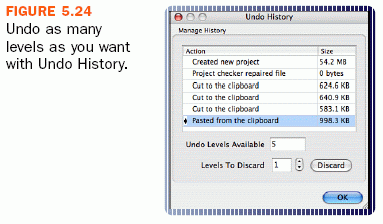
To jump back several steps, or to see everything that you've done to a file, use View, History, which shows you something like you see in Figure 5.24.

For more about incorporating music into your podcast, see Chapter 11, "Add a Musical Intro and Outro."
Fading In and Out
Most popular music nowadays finishes not with a sudden, abrupt ending but with a gradual fade out. This is usually a nice way to end—and begin!—your podcast as well, especially if you utilize some sort of music to bring listeners in and then lead them out at the end.
The easiest way to reduce the volume gradually on a part of your podcast is to select the area you want to change and then go to Effect, Fade Out. You can see the results in Figure 5.25.

Likewise, to gradually increase the volume on part of an audio file, select the area and then choose Effect, Fade In. Audacity produces what you see in Figure 5.26.

For most people, the changes made with the Fade Out and Fade In effects are just fine. The only real control you have is based on the length of your selection—the longer the time span chosen, the more gradual the fade in or out—but that will produce acceptable results most of the time.
However, if you want complete control over the changes in volume over time, you need to familiarize yourself with the Envelope tool, shown in Figure 5.27.

Let's illustrate the use of the Envelope tool by working on the brief audio file shown in the following figure.

Remember, the Fade Out effect would create a very linear, gradual decrease in volume. In the case of this audio file, I want the last five seconds to contain the fade out. Specifically, I want a fairly sudden drop in the first two seconds, and then a more gradual lowering over the last three seconds. No problem for the Envelope tool.
I start by selecting the Envelope tool, and then click once on the waveform around the 8.0 second mark (about five seconds before the audio clip ends). Where you click is important. If you click within the waveform, you then can adjust the overall volume of your clip by moving your mouse up or down. Up makes the audio louder overall; down reduces the entirety of your audio. If you want to set your initial mark for the Envelope tool without adjusting your clip's volume, carefully click on the blue line at the top of the band containing the waveform, as shown in Figure 5.28.

Since I want a pretty abrupt drop about two seconds after the fade out starts, I now click with the Envelope tool at 10.0. This time, however, I click within the waveform itself. I just click; I don't drag my mouse, as that will adjust the volume, and I don't want to do that yet.
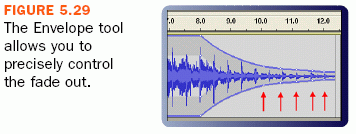
I add other control points at 10.5, 11.0, 11.5, and 12.0, just by clicking on the waveform. Now that they're in place, I go back and carefully click on each individual point I inserted. As I click on a point, I move my mouse up to increase the volume and down to lower the volume. I walk through each control point until I get the results you can see in Figure 5.29 (the arrows have been added so that you can more easily see the control points; Audacity won't put those in there).

If I insert a control point and want to move it to a new location, clicking and dragging it to a new location on the waveform works perfectly. If I insert a control point and decide I don't want it any longer, I can just click on it and then drag it outside the track. When I release the mouse, the control point is gone.
The Envelope tool performs the same function as the Fade In and Fade Out effects—it changes volume over time—but it gives you a heck of a lot more control over just how that fading occurs. You may never use it, but when you need it, you'll be glad that Audacity's developers had the foresight to include such a powerful feature.
Conclusion
If you're going to take podcasting seriously, you're going to have to edit the initial audio that you record. Sure, a few successful podcasts are considerably more raw, with little to no editing, but that's the exception, not the rule. Just because a popular podcast gets away with it, does not mean that you can. Take the time to edit your podcast and make it sound great. You'll be proud of your work, and your audience will appreciate the extra polish that you put into place!

This chapter is excerpted from Podcasting with Audacity: Creating a Podcast With Free Audio Software (Digital Short Cut), authored by Dominic Mazzoni and Scott Granneman, published by Prentice Hall, © Copyright 2007 Prentice Hall. All rights reserved.
[previoous] [next]
URL:


 Digg This
 Find a programming school near you