Menus with Beauty and Brains 4 pg 5: Production Graphics with Wendy Peck at webreference.com
 |
Menus with Beauty and Brains 4: Saving Rollover Images | |
|
|
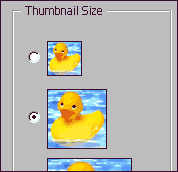
We have almost arrived at the point where you create a rollover image automatically. Just a few more steps and you can let the program take it away. If the window containing the Rollover tab is not open (it is the same as the Slices window), open it now. Make sure the Rollover tab is active and that the first slice is selected. Note: You should be able to see the slice contents in the thumbnail image. If not, you can increase the size of the thumbnail. Click the arrow at the top right edge of the Rollover window, and select Palette Options from the fly-out menu. Select the desired thumbnail size. |
|
|
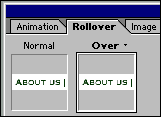
When the New Rollover State button is clicked, ImageReady creates an Over state thumbnail that with the same content as the Normal state (original).
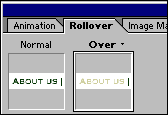
Rollover state with document layer visibility changed to feature the correct layer(s). |
To change this rollover, I turned off the visibility of the dark green layer and turned on the light green layer. You can see the change reflected in in the sample shown at the left. If you are using the layer style method for creating rollover images, you would create the rollover by turning on the effect (or off, depending on how you have set it up). To create the rollover for the second image, return to the document, and with the Slice Select tool, select the second slice. You can change the Normal or Over appearance at any time, by clicking on the thumbnail to activate, and making the appropriate changes to the main document. Work carefully through this process, and check all of your rollovers before moving on to saving your images. ImageReady allows you to create many states. Normally, you would never require more than four, adding an image to show on clicking and one to indicate that the menu item is the current page. The last two states are not used often. |
|
|
Completed menu created automatically in ImageReady. |
Saving Rollover Images You don't want to relax and let yourself get careless at this stage. If you have 10 menu items, and three states for your rollovers, that adds up to 30 images. I don't know about you, but when I put 30 images anywhere, I want to know that they are in the right place and doing the job they are intended to do. |
|
|
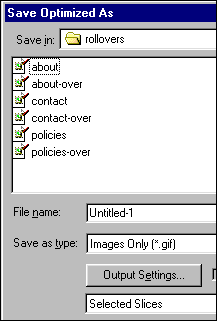
Settings for saving images only, along with a list of the files created in a previous save. |
We are only worried about the graphics for this exercise. Saving the HTML and images together is not complicated, though you do have to be careful. However, saving only images is relatively simple. When all your slices are perfect, and your optimization and rollovers complete, select File>Save Optimized As. First, browse to where you would like your graphic files placed, and I do recommend storing them in a separate file from your main documents. I also recommend selecting all the slices in your document that you wish to export, unless you are slicing a full image. If you are just creating menus, or only need to save part of the overall page as images, you will usually have extra files created unless you select the slices you want and export only those files. When saving images only, you can leave the File Name as the default (it is not used) and select Images Only for the Save as Type field. |
|
|
A selection of nine drop-down selection menus provides almost unlimited combinations for file naming. The Example shows a sample of how the final saved name will look. |
Finally, you have to tell ImageReady how you would like to name the files you are creating. Click on the Output Settings button to open the Output Settings window. Make sure that the Saving Files option is selected from the drop-down menu. The file naming section of the window allows you to specify what information is included in the file name. I like to keep my name simple and only add a rollover state to the name with a hyphen between the words. (The Slice Name reference is slice name you entered when preparing the files.) In the sample at the left, I have set the the File Naming section to show the name, followed by a hyphen, then the rollover state and finally, the GIF or JPG extension (taken from the optimization settings you entered earlier). Note the small line just under the name choices fields. This line shows exactly how your file names will appear. When you are just saving files, you do not need to activate the Copy background option, or to place files in a folder. The copyright activation is optional. |
|
|
Once your file settings are all correct, click OK to leave the Output Settings screen, and Save to save your files. Check to make sure that the images are correct and have been placed in the right place. If all has gone well, and it should have, you can safely repeat the exercise many times as you tweak your designs. ImageReady holds the previous settings, which means you do not have to set the naming convention, or any other setting. The new files will replace the original files. Long instructions? Yes, that's true. If you have not worked through this process, it may seem confusing. But once you have the method, and add a little practice, you will find that you move quickly through the entire process. I find that I am more willing to entertain changes late in a project than I would be without automated rollover creation. Give it a try if you have not completed the process in the past. If you have been using ImageReady but do not feel completely in control of saving your files, try stepping through and saving as I have described. I find that most automated methods are best used with some manual attention. Saving files in ImageReady is no exception. Good luck with this most important technique. |
||
|
|
Menus with Beauty and Brains 4: Tutorial IndexPhotoshop and ImageReady Rollovers
|

Created by Wendy Peck,
URL: https://www.webreference.com/graphics/column47/
Created: May 14, 2001
Revised: May 14, 2001
 Find a programming school near you